Overlay Networks
The Diamanti Overlay Network (Private Network) feature provides a cluster-wide, single, private IP address pool from which IP addresses can be assigned per pod. This permit scaling the number of pods in environments in which a limited pool of public IP addresses are available. Using this feature, pod-to-pod traffic within a node is forwarded using a private IP address, while pod-to-pod traffic across nodes is forwarded using VxLAN overlay networking.
To use the overlay network feature, users need to configure a /16 IPv4 subnet that does not overlap with the node management network or cluster data networks. Only one overlay network is available per cluster, though different clusters can assign the same subnet for the overlay network.
The feature further supports traffic isolation across namespaces for pods using overlay network endpoints. This is enforced using VxLAN VNI tags.
Requirements
Note the following requirements:
An overlay network configuration requires netmask 255.255.0.0 configured for the overlay subnet.
To disable namespace-based segregation, create the private network with the following setting: –isolate-ns=False.
Limitations
Note the following when working with overlay networks:
Multiple private networks are not supported.
Endpoints are created from the private network during pod creation but are not visible using the dctl endpoint list command. This is expected since the command lists endpoints with committed hardware resources.
Quality of service (QoS) is not guaranteed on the private network endpoint. Upper network bandwidths are supported however.
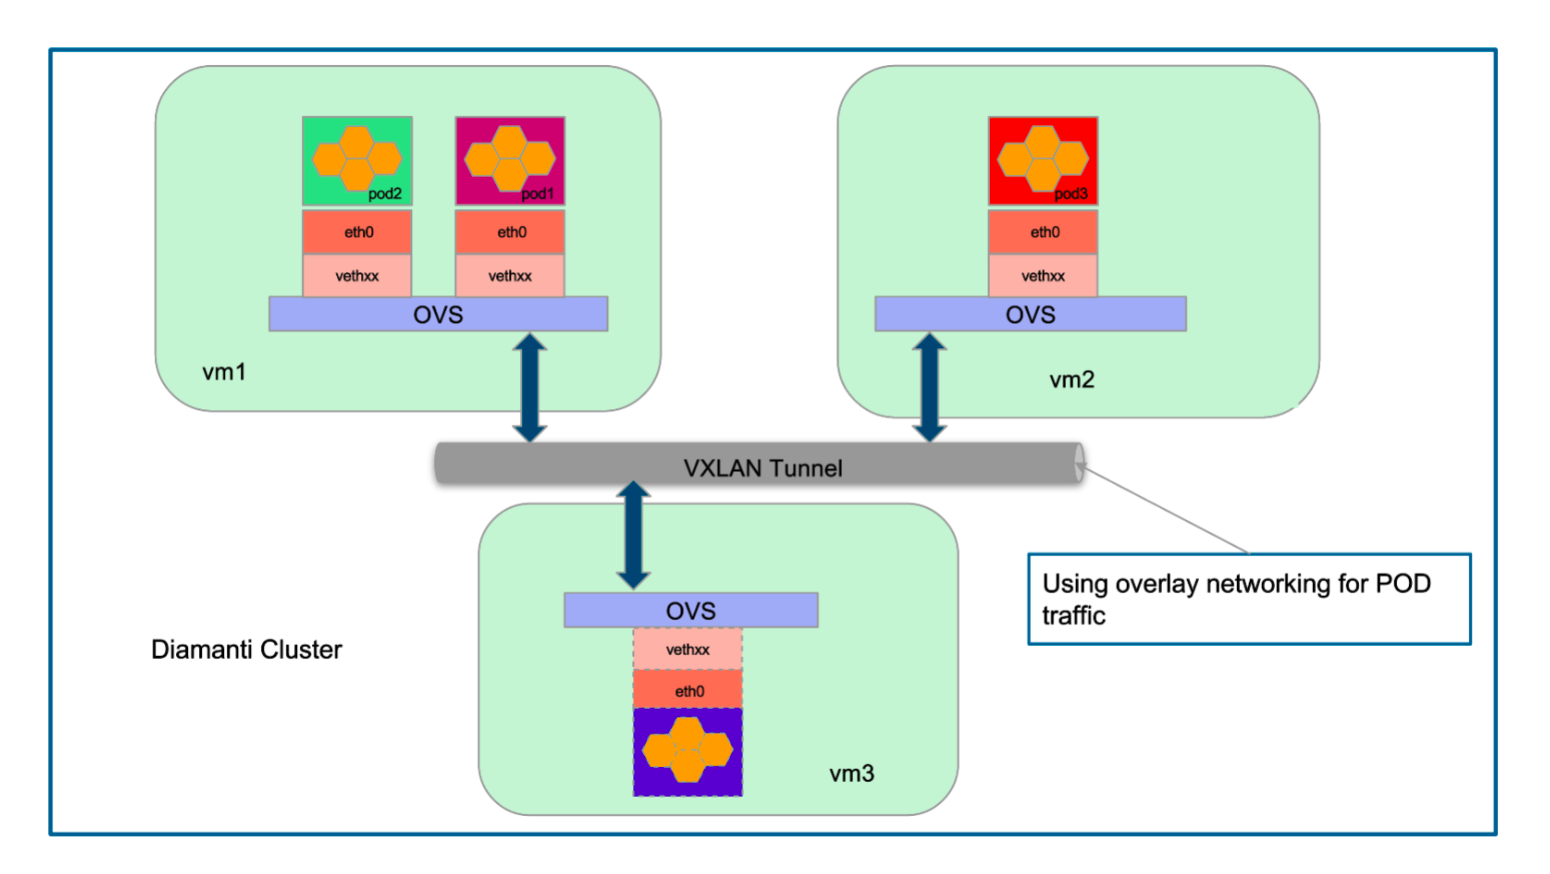
Overlay Network Topology
The following figure illustrates the overlay network topology, showing IP address management:
Create an Overlay Network
Before a pod can use an overlay network endpoint, administrators need to configure an overlay network, as described in this section.
Do the following:
Create overlay network using the following command:
dctl network overlay create <network-name> -s <subnet/class>
[--isolate-ns=True] [--set-default]

For example:

$ dctl network overlay create red -s 172.30.0.0/16
NAME TYPE SUBNET OVERLAY-NW ISOLATE-NS NETWORKGROUP
red private 172.30.0.0/16                 true
Verify that the overlay network has been created using the following command:
dctl network overlay list

For example:

$ dctl network overlay list

NAME TYPE SUBNET OVERLAY-NW ISOLATE-NS NETWORKGROUP
red private 172.30.0.0/16                     true
Update the private network using the following command:
dctl network overlay update <private-network-name> <--set-default | --clear-default>

For example:

$ dctl network overlay update red --set-default
Successfully updated network
The following example creates two namespaces, deploys NGINX pods in both namespaces that use the overlay network, and shows how to achieve namespace isolation using overlay network policies.
Create the namespaces using the following command:
kubectl create namespace <namespace-name>

For example:

$ kubectl create namespace coffee
namespace/coffee created

$ kubectl create namespace tea
namespace/tea created
List the network namespaces for the private network:
dctl network overlay list-namespaces <private-network-name>

For example:

$ dctl network overlay list-namespaces red
NAME
default kube-node-lease diamanti-system coffee kube-system kube-public tea
Create the NGINX pod in different namespaces using the following command:
kubectl create -f <specification-file> -n <namespace-name>

For example:

$ kubectl create -f nginx.json -n coffee
pod/nginx-1 created

$ kubectl create -f nginx-2.json -n tea
pod/nginx-2 created

Display the pod information using the following commands:

$ kubectl get pods -o wide -n coffee

NAME READY STATUS RESTARTS AGE IP NODE
nginx-1 1/1 Running 0 2m21s
172.30.8.2 appserv78

$ kubectl get pods -o wide -n tea

NAME READY STATUS RESTARTS AGE IP NODE
nginx-2 1/1 Running 0 36s
172.30.0.2 appserv76
The following shows the nginx.json specification file. Note that for private networks, only upper-bandwidth limits are honored for a performance tier.
{
"kind": "Pod",
"apiVersion": "v1",
"metadata": {
   "name": "nginx",
   "creationTimestamp": null,
   "annotations": {
      "diamanti.com/endpoint0": "{
            \"network\": \"red\",
            \"perfTier\": \"best-effort\"
         }"
   }
},
"spec": {
   "containers": [
      {
      "name": "nginx",
      "image": "docker.io/nginx:1.10",
      "resources": {
         "requests": {
            "cpu": "400m",
            "memory": "512Mi"
         }
      },
      "imagePullPolicy": ""
      }
   ],
   "serviceAccountName": ""
},
   "status": {}
}
Confirm that the network isolation policy blocks forwarding across namespaces using the following command:
kubectl exec -it nginx /bin/bash -n <namespace-name>

For example:

$ kubectl exec -it nginx /bin/bash -n coffee
root@nginx:/# ping 172.30.0.2
PING 172.30.0.2 (172.30.0.2): 56 data bytes
^C--- 172.30.0.2 ping statistics ---
8 packets transmitted, 0 packets received, 100% packet loss
Join network namespaces for the private network using the following command:
dctl network overlay join-namespaces <private-network-name>
namespace1,namespace2,namespace3

For example:

$ dctl network overlay update red --join-namespaces coffee,tea
Successfully joined the network namespaces [[coffee tea]]
Verify that forwarding across the namespaces is enabled after joining the namespaces using the following command:
kubectl exec -it nginx /bin/bash -n <namespace-name>

For example:

$ kubectl exec -it nginx /bin/bash -n coffee
root@nginx:/# ping 172.30.0.2
PING 172.30.0.2 (172.30.0.2): 56 data bytes
^C--- 172.30.0.2 ping statistics ---
packets transmitted, 3 packets received, 0% packet loss
Note that administrators can isolate the namespaces again using the following command:
dctl network overlay isolate-namespaces <private-network-name>
<namespace-name>

For example:
$ dctl network overlay update red --isolate-namespaces tea
Successfully updated network
Ping the pod in different namespaces after isolating the namespaces using the following command:
kubectl exec -it nginx /bin/bash -n <namespace-name>

For example:

$ kubectl exec -it nginx /bin/bash -n coffee
root@nginx:/# ping 172.30.0.2
PING 172.30.0.2 (172.30.0.2): 56 data bytes
^C--- 172.30.0.2 ping statistics ---
packets transmitted, 0 packets received, 100% packet loss
Note that administrators can delete the overlay network using the following command:
dctl network overlay delete <network-name>

For example:

$ dctl network overlay delete red
Successfully deleted network