Replication In Diamanti Ultima products
Introduction
The Diamanti Asynchronous Replication feature enables asynchronous replication of PVCGroups (Consistency Groups) across multiple Diamanti Ultima clusters, providing a solution for a number of situations including the following:
Disaster Recovery (DR)
Stateful application migration across clusters
Content distribution and consolidation
Follow-the-sun business model (source and target periodic role swaps)
Users create replication configurations on a local (source) cluster and remote (target) cluster to kick start periodic data replication of data.
Assumptions
This document assumes the user of this document has a good understanding of the following
Diamanti Ultima Accelerator
Diamanti Ultima Enterprise on GCP, AWS and Virtual Machine and BareMetal.
Networking concepts
Replication and Disaster Recovery
Key Concepts and Terms
Asynchronous replication relies on several key terms and concepts, including the following:
PVCGroup (Consistency Group)
This is a group of Persistent Volume Claims (PVCs) used as dataset by an application or set of loosely-coupled applications (for example, a federated application). If application I/O to these PVCs have an inter-dependency, the group qualifies to be called a Consistency Group.
This means that, for a snapshot of this type of PVC group to be application consistent, it is essential to create the snapshot of all PVCs in this group simultaneously (at the same I/O boundary).
Rlink (Replication Link)
This represents network link to a remote cluster. An Rlink encapsulates all replication parameters specific to a remote site.
Source
This is a role in a replication operation. The source captures application updates to volumes and replicates them to a DR (target) site.
Create the Replication custom resource Target
This is also a role in a replication operation. The target receives updates from the source and applies the updates to local volumes.
Dataservice operator
This is a controller launched when a user enables the Asynchronous Replication feature in a cluster. The Dataservice operator watches for CRUD (create, read, update, and delete) operations on Replication custom resource objects and creates, deletes, or updates the replication driver corresponding to each replication instance.
Replication driver
This is the deployment (on the target site) or cronjob (on the source site) launched for each replication configuration. The replication driver is the main replication engine that performs all replication-related tasks.
Explore Diamanti Objects
This section describes the principal Diamanti objects used by the Asynchronous Replication feature.
PVCGroup Object
The PVCGroup object is a Kubernetes custom resource object used to group one or more PVCs used by an application.
Replication Object
The Replication object is a Kubernetes custom resource object used to specify a replication configuration for a single PVCGroup. The Replication object is a namespaced object. All PVCs in a PVCGroup specified in a Replication CR must belong to the same namespace.
A Replication object configures the following parameters:
The PVCGroup that needs to be replicated. The maximum number of PVCs in a PVCGroup is 16.
The schedule (RPO) for running the replication. The replication job is run periodically based on the configured schedule.
The local network endpoint
The remote IP address
Replication Driver
The Dataservice operator waits for Replication CR creation and triggers the corresponding replication driver. The state machine of the replication driver is as follows:
Connection—The source and target drivers perform a handshake connection request/ response and establish a session.
Configuration reconciliation—The source and target drivers exchange PVCGroup configurations (including the number of PVC, the PVC sizes, and more) and ensure that the configurations match.
Replication reconciliation—The source and target drivers exchange replication status (in case the last scheduled data transfer was disrupted for any reason), which includes the extent to which each PVC in the PVCGroup was replicated. This enables the source driver to resume replication as needed.
Extraction—The system extracts the data blocks changed since the last scheduled replication.
Data transfer—The data transfer is performed.
Update and disconnect—The session ends, at which point the target driver takes a snapshot of the PVCGroup to serve as a consistent copy at the end of replication for this interval. If the data transfer was disrupted for any reason, the snapshot is not created since the volumes on the target might be in an inconsistent state.
The Dataservice operator includes a reconciler that periodically checks for updates on the Replication object and triggers appropriate action. The Dataservice operator can handle multiple Replication objects across different namespaces and sets up a separate replication driver for each.
Note that the number of IP addresses required for replication corresponds to the number of Replication objects created. The source cluster and target cluster should have connectivity over the data network to transfer the data blocks.
Replication Topologies
This section discusses a few of the possible combinations that can be used in configuring source and target cluster in replication. This does not cover all the combinations but gives a fair idea on how the network topology will be for a specific combination of source and target cluster in replication. Zoom in on the diagrams for the details.
Ultima Accelerator to Ultima Accelerator
Refer to the diagram below, if the source and target cluster is Ultima Accelerator. At the source side, IP address of the L2 static endpoint of the target cluster is used as a remote address in the source cluster. In the case of failover, IP address of the L2 static endpoint of the source cluster is used as a remote address in the target cluster.

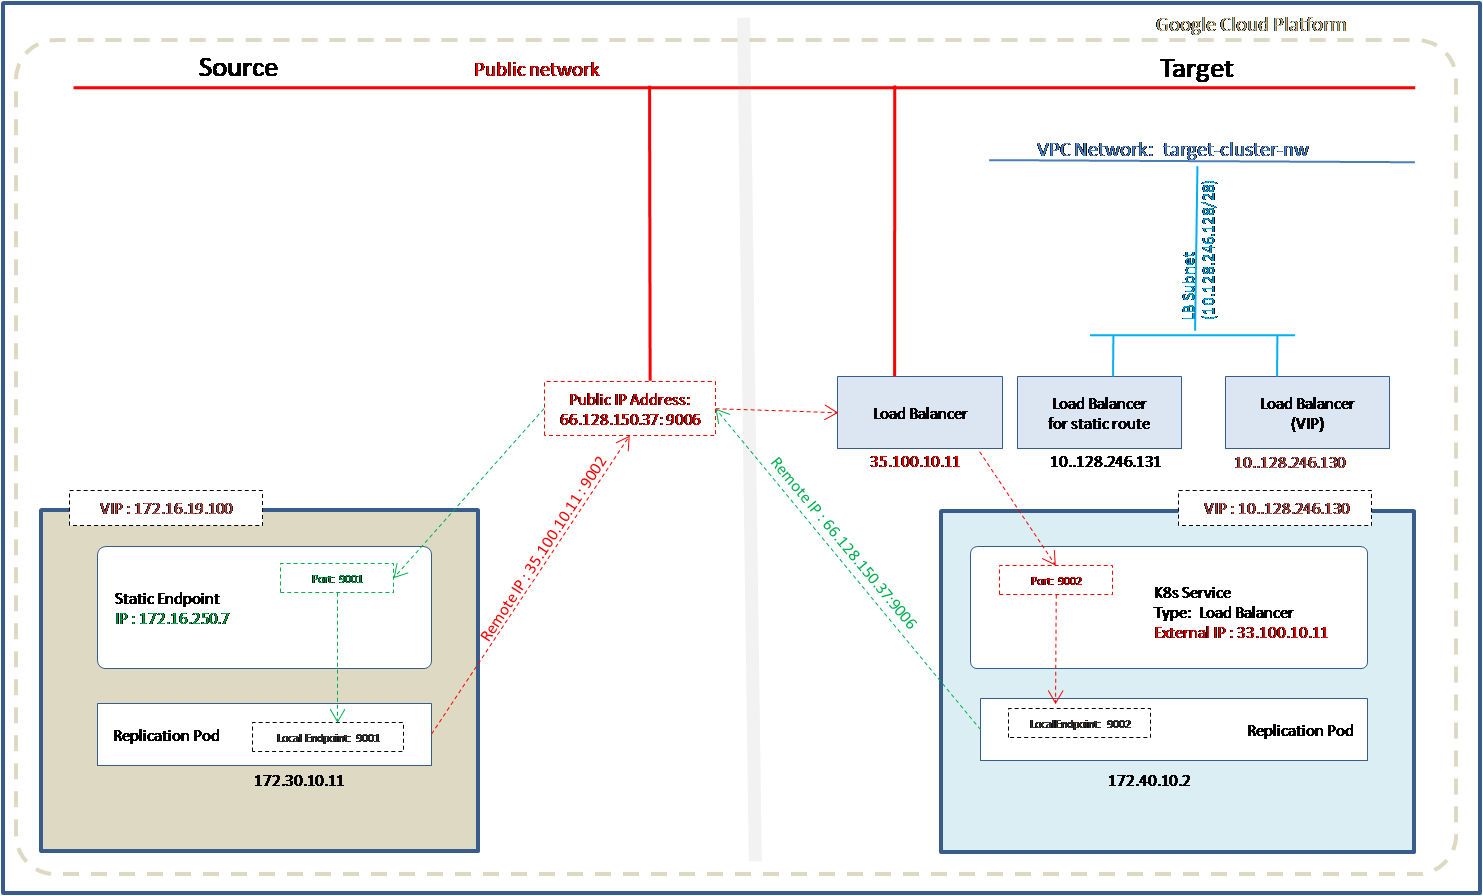
Ultima Accelerator to Ultima Enterprise on GCP/AWS using K8s LB service for internal or external network
Refer to the diagram below, if the source cluster is Ultima Accelerator and the target cluster is Ultima Enterprise. Ultima Enterprise on the target side can be on AWS or GCP created with the internal or external network.
At the source side, IP address of the Kubernetes Load Balancer service of the target cluster is used as a remote address in the source cluster. In the case of failover, IP address of the L2 static endpoint of the source cluster is used as a remote address in the target cluster.
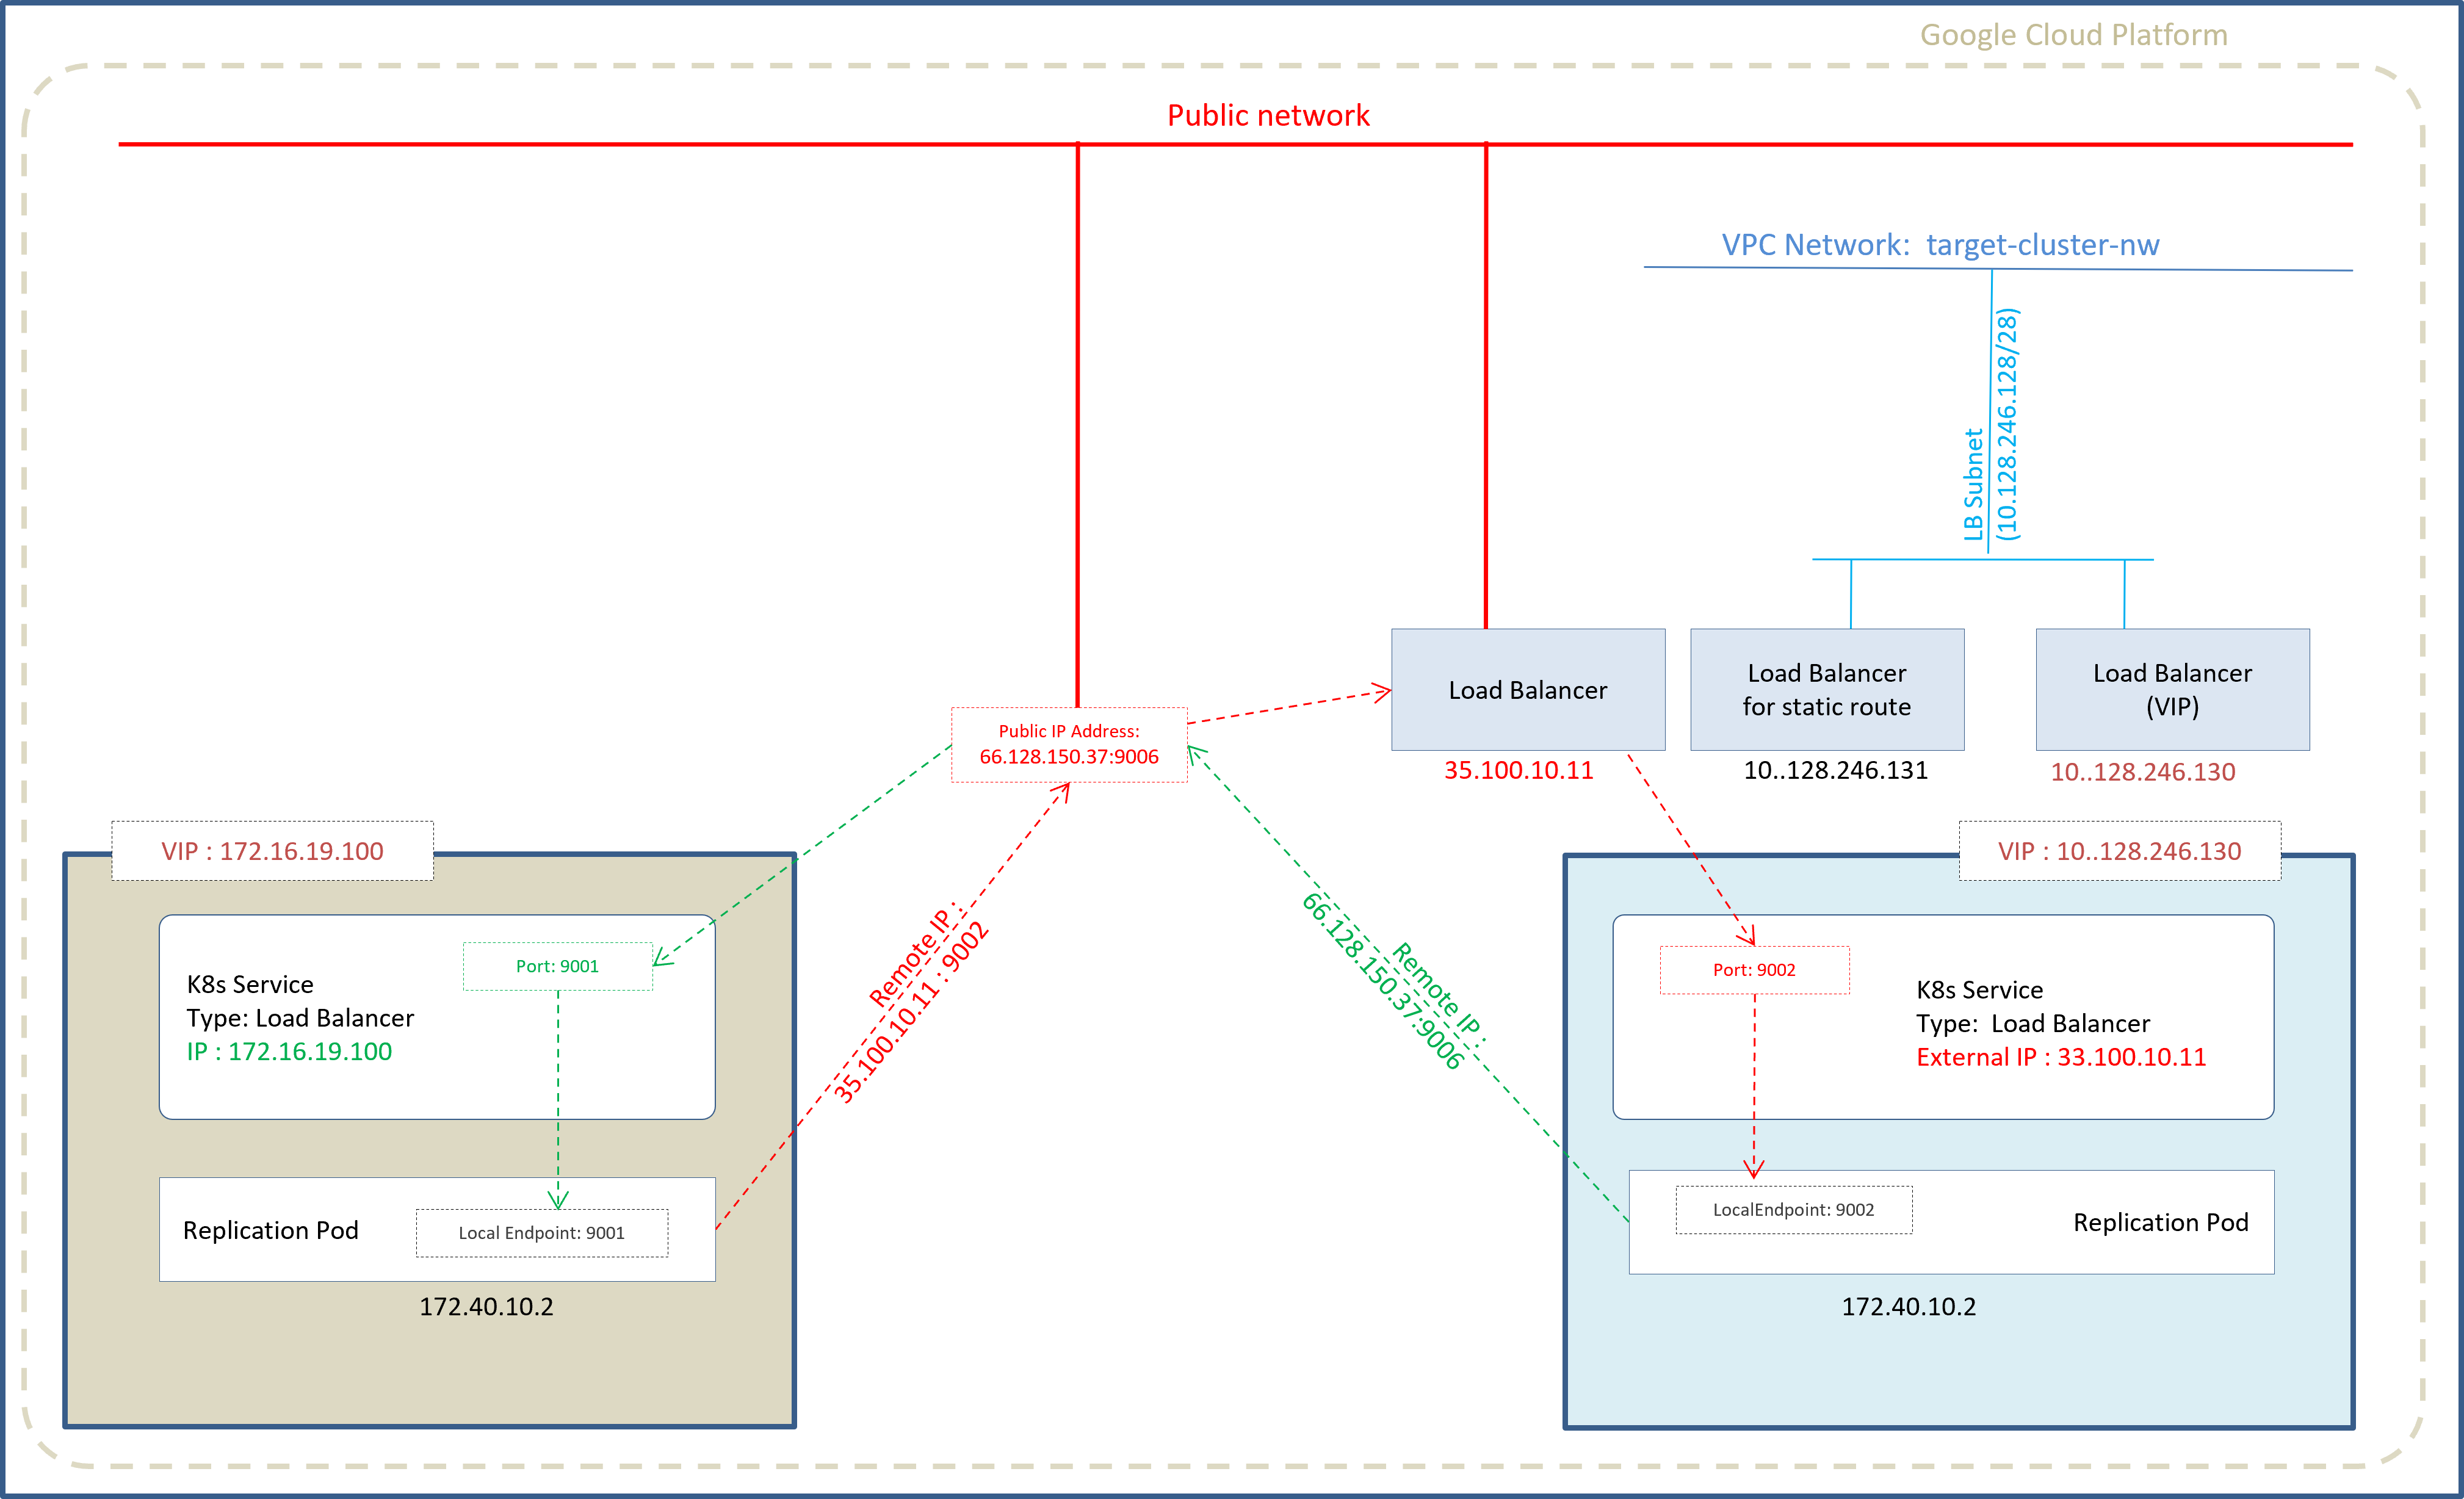
Ultima Enterprise on VM/BM to Ultima Enterprise on GCP/AWS using K8s LB service for internal and external network
Refer to the diagram below, if the source cluster is Ultima Enterprise on VM/BM and the target cluster is Ultima Enterprise. Ultima Enterprise on the target side can be on AWS or GCP created with the internal or external network.
At the source side, IP address of the Kubernetes Load Balancer service of the target cluster is used as a remote address in the source cluster. In the case of failover, IP address of the Kubernetes service is mapped to a public IP address at the source side and this public IP address is used as a remote address in the target cluster.
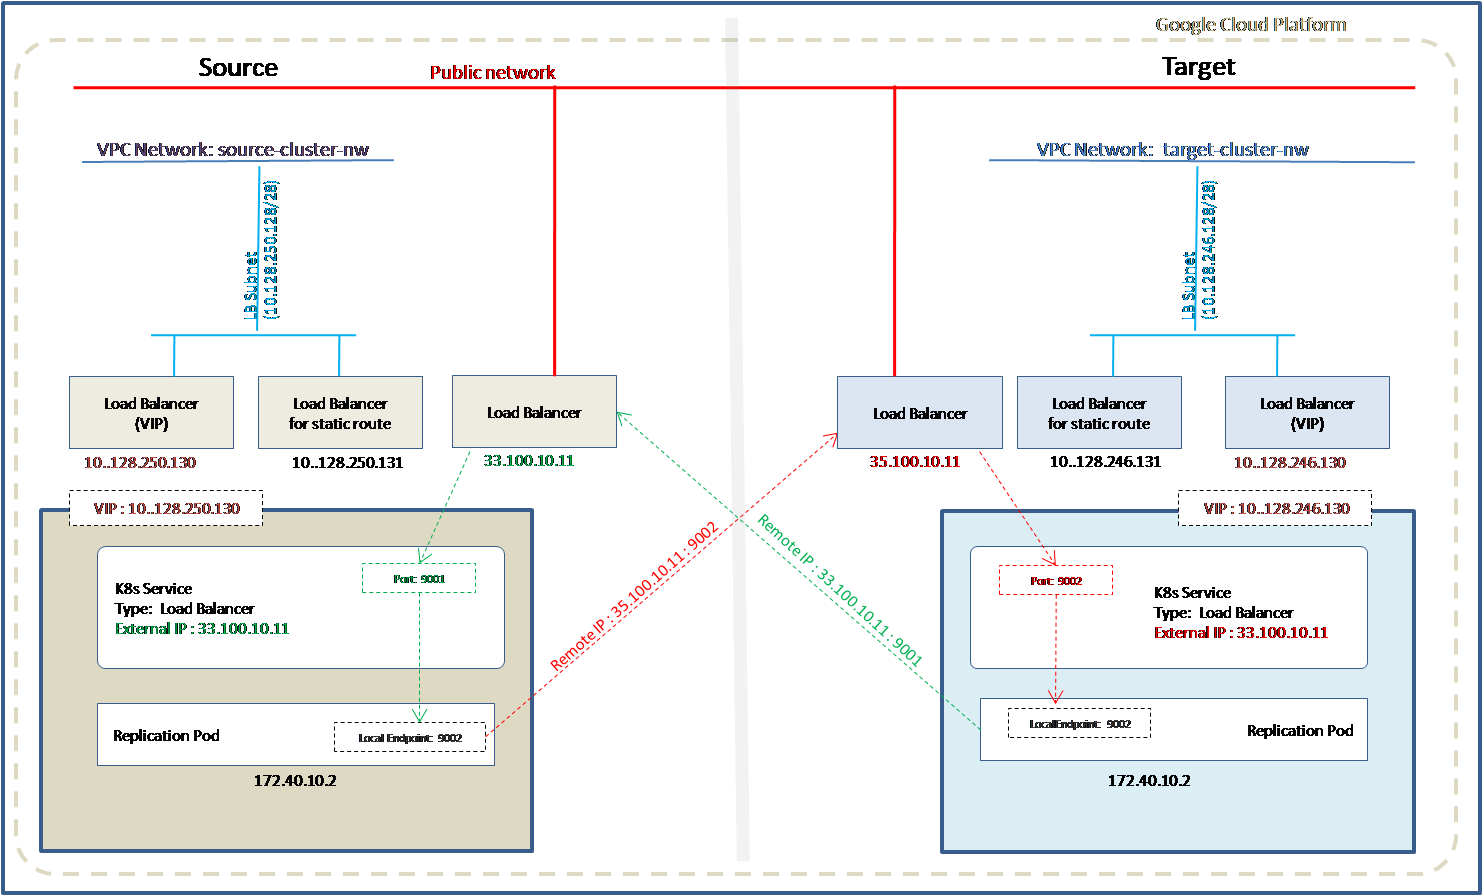
Ultima Enterprise on GCP/AWS to Ultima Enterprise on GCP/AWS using K8s LB service or internal and external network
Refer to the diagram below, if the source cluster is Ultima Enterprise on GCP or AWS and the target cluster is also either Ultima Enterprise on GCP or AWS. Ultima Enterprise on either side can be created with the internal or external network.
At the source side, IP address of the Kubernetes Load Balancer service of the target cluster is used as a remote address in the source cluster. In the case of failover, IP address of the Kubernetes Load Balancer service of the source cluster is used as a remote address in the target cluster.
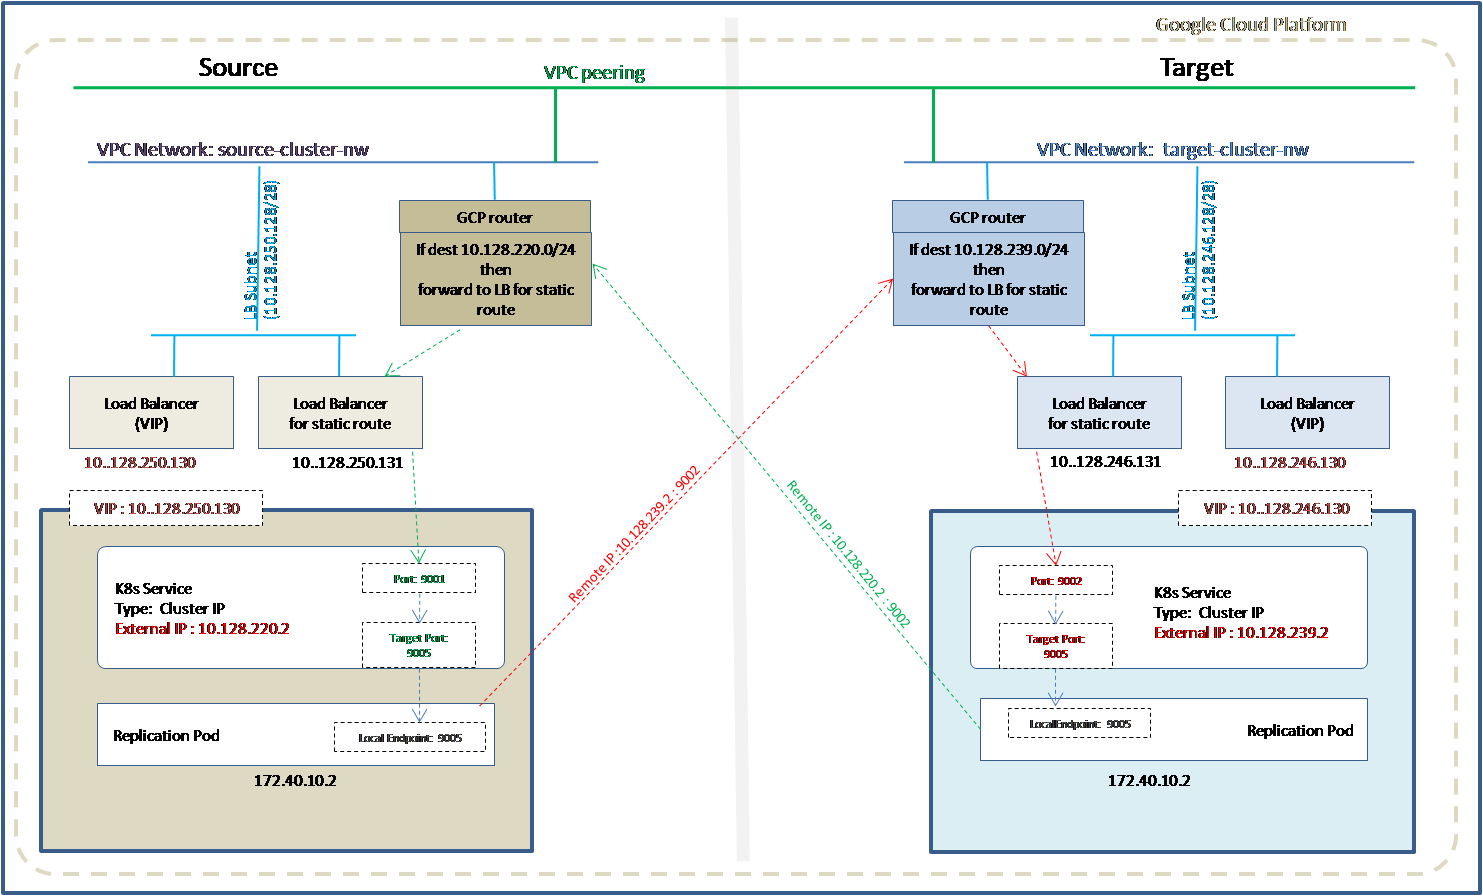
Ultima Enterprise on GCP to Ultima Enterprise on GCP using internal network for static route
Refer to the diagram below, if the source and target clusters both are Ultima Enterprise on GCP and static routes are used for communication to the pod network from outside instead of K8s service of type Load Balancer. VPC peering needs to exist between the source and target cluster.
At the source side, IP address of the Kubernetes service of type Cluster IP with the external IP address of the target cluster is used as a remote address in the source cluster. In the case of failover, IP address of the Kubernetes service of type Cluster IP with the external IP address of the source cluster is used as a remote address in the target cluster.
Prerequisites
The following prerequisites are only related to async replication and that also depends on what is the source and target in the replication.
If Ultima Accelerator or Ultima Enterprise on VM/BM is configured with the private IP address in on-prem cluster and must be configured for replication with the cluster on the other network, a public IP address mapping to L2 static endpoint address is required on the source side. The same is true if the on-prem clusters are configured with the private IP address at the target side.
Firewall port 9001 on the source side and port 9002 is open on the target side if the cluster was created using the static route.
Firewall port 9006 is open if Ultima Accelerator or Ultima Enterprise on VM/BM is used either at source or target cluster.
If the source and target clusters both are in GCP and using internal network for static routing, ensure VPC peering is configured between the source and target cluster. Follow the instructions in the section below VPC Peering creation [Internal] to create VPC peering.
VPC Peering creation or static using Internal network
Using VPC peering, two networks can be connected for communication. For example, if two networks “source-network” and “target-network” are peered, then custom network “target-network” can be accessed from the “source-network”.
Create a file replication_peer_network.json and add content as shown below if the peer networks are source-network-name and “target-network-name”.
{

   "peer_network": [{

      "network_name": "source-network-name",

      "peer_network_name": "target-network-name"

   }]

}
Same json can be used to delete VPC peering. It is recommended to delete VPC peering first and then subnets and networks.
To create the VPC peering, use the command below.
$ python3.8 gcp_deploy.py --config-json-file config_json/peer_network.json --command create-vpc-peering
To delete the VPC peering, use the command below.
$ python3.8 gcp_deploy.py --config-json-file config_json/peer_network.json --command del-vpc-peering
Configure Replication
This section describes how to configure replication between Diamanti Ultima clusters using the Asynchronous Replication feature.
Note
Note: The example specification files for CRs described in this section are available at:
/usr/share/diamanti/manifests/examples/dataservice/crs/
The replication configuration is divided into two parts. The first part is common for source and target cluster running on any supported platform. The second part is specific to the platform where the cluster is running.
Configuring replication using the command line (CLI)
Part 1 - Common configuration
Below are the common steps that are to be performed as part of configuring replication.
Configure Target Cluster
On the target cluster, do the following:
Create PVCs matching the size that exists on the source cluster.
Note
Important: The new PVCs must be exactly the same size as the corresponding PVCs on the source cluster.
Prepare a PVCGroup custom resource specification file as shown below. Add the list of PVCs of the application that should be part of the replication.
/usr/share/diamanti/manifests/examples/dataservice/crs/ dataservice_v1alpha1_target_pvcgroup_cr.yaml
$ cat dataservice_v1alpha1_target_pvcgroup_cr.yaml
apiVersion: dataservice.diamanti.com/v1alpha1
kind: PVCGroup
metadata:
  name: target-pvcgroup
  namespace: example-ns
spec:
  # Add fields here
  pvcList:
  - pvcName: target-pvc1
  - pvcName: target-pvc2
Create PVCGroup custom resource using the specification file.
$ kubectl create -f <specification-file>
For example:
$ kubectl create -f dataservice_v1alpha1_target_pvcgroup_cr.yaml
Configure Source Cluster
This section assumes that PVCs to be replicated are already created and currently used by the application.
On the source cluster, do the following:
Prepare a PVCGroup custom resource specification file as shown below. Add the list of PVCs of the application that should be part of the replication.
/usr/share/diamanti/manifests/examples/dataservice/crs/ dataservice_v1alpha1_source_pvcgroup_cr.yaml
$ cat dataservice_v1alpha1_source_pvcgroup_cr.yaml

apiVersion: dataservice.diamanti.com/v1alpha1
kind: PVCGroup
metadata:
  name: source-pvcgroup
  namespace: example-ns
spec:
  # Add fields here
  pvcList:
  - pvcName: source-pvc1
  - pvcName: source-pvc2
Create PVCGroup custom resource using the specification file.
$ kubectl create -f <specification-file>
For example:
$ kubectl create -f dataservice_v1alpha1_source_pvcgroup_cr.yaml
Part 2 – Platform specific configuration
Below are the remaining steps to configure source or target cluster depending on which platform the source and target cluster is running. Follow the instructions for the desired target and source configuration. For example, if source cluster is Ultima Accelerator and the target cluster is Ultima Enterprise on GCP, follow the steps for that particular section. The target cluster is to be configured first before the source cluster.
Note
Note: If there is a plan to reboot a node where replication pod is running, then the existing replication must be allowed to finish, pause the replication and then reboot the node. Once the node is up and cluster status is good, and it shows node in good state as part of cluster then the replication can be started.
Configure Target Cluster
Follow the instructions for the product that is to be configured as the Target cluster in the replication configuration.
Ultima Accelerator as Target
Create a static network endpoint in the diamanti-system namespace using the following command:
$ dctl endpoint create target-endpoint -n <network> -ns <namespace>
For example:
$ dctl endpoint create target-endpoint -n nw01 -ns diamanti-system
Update the following fields in the specification file of Replication custom resource
remoteIPAddress: Combination of IP address of static endpoint and the port separated by colon.
schedule: The cron job schedule to configure replication interval
/usr/share/diamanti/manifests/examples/dataservice/crs/ dataservice_v1alpha1_replication_target_cr.yaml
$ cat dataservice_v1alpha1_replication_target_cr.yaml

apiVersion: dataservice.diamanti.com/v1alpha1

 kind: Replication
 metadata:
   name: target-rep1
   namespace: diamanti-system
   annotations:
     replicationDriver: diamanti/replication-driver:v3.6.0-ba5c12f
     imagePullPolicy: IfNotPresent
     # Add the follwing annotation in case of openshift cluster
     # k8s.v1.cni.cncf.io/networks: ADDITIONAL_NETWORK_NAME
 spec:
   # Add fields here
     role: target
     pvcGroupName: target-pvcgroup
     pvcGroupNameSpace: diamanti-system
     snapshotPromotor: diamanti
     failoverPolicy: Automatic
     failbackPolicy: Manual
     rlinks:
       - rlinkName: target
         schedule: "*/5 * * * *"
         localEndpoint: target-endpoint:9002
         remoteIpAddress: <Source Exretnal service IP Address>:9001
         retainSnapshotsOnDeletion: true
         pvcMap:
            target-pvc1: 'source-pvc1'
            target-pvc2: 'source-pvc2'
Create the Replication custom resource using the PVCGroup and network endpoint (from the previous steps) using the following command:
$ kubectl create -f <specification-file>
For example:
$ kubectl create -f dataservice_v1alpha1_replication_target_cr.yaml
Ultima Enterprise on GCP (using Load Balancer service) as Target using external and internal network
The below steps are for the cluster configured with external or internal network and the Kubernetes service of type Load Balancer is used for external communication.
The sample specification files are also available at /usr/share/diamanti/manifests/examples/dataservice/crs/
Update spec.selector ‘app’ with the value <replication object name>target-rep1 <Rlink> target. (After replication object name, append rlink name without any – or space).It is target-rep1target. The replication object name is the name that will be used to create a replication object in the later stage and Rlink names can be obtained from replication specifications.
/usr/share/diamanti/manifests/examples/dataservice/crs/dataservice_svc_loadbalancer.yaml
apiVersion: v1
kind: Service
metadata:
   name: target-service
   namespace: diamanti-system
spec:
   selector:
      app: target-rep1target
   ports:
   - port: 9002 #it is a local port number of replication pod
   type: LoadBalancer
Wait for few minutes until the service acquires IP address of the Load Balancer. After that run the command below to note down the service IP address.
$ kubectl get svc target-service
Update the following fields in the specification file of Replication custom resource
remoteIPAddress: Combination of IP address of source cluster and the port separated by colon. schedule: The cron job schedule to configure replication interval pvcMap: The mapping of source and target PVCs.
$ cat dataservice_v1alpha1_replication_target_cr_ue.yaml

apiVersion: dataservice.diamanti.com/v1alpha1
 kind: Replication
 metadata:
   name: target-rep1
   namespace: example-ns
   annotations:
     replicationDriver: diamanti/replication-driver:v3.6.0-ba5c12f
     imagePullPolicy: IfNotPresent
     spektra.diamanti.io/DSS-on-prem-cluster: "true"
     spektra.diamanti.io/DR-load-balancer: "true"
 spec:
   # Add fields here
     role: target
     pvcGroupName: target-pvcgroup
     pvcGroupNameSpace: example-ns
     snapshotPromotor: diamanti
     failoverPolicy: Automatic       #For future use
     failbackPolicy: Manual          #for future use
     rlinks:
       - rlinkName: target           #For future use
         schedule: "*/5 * * * *"
         localEndpoint: ":9002"
         remoteIpAddress: <Source Ip Address of service>:9001
         retainSnapshotsOnDeletion: true
         pvcMap:
            target-pvc1: 'source-pvc1'
            target-pvc2: 'source-pvc2'
         suspendReplication: false
Create the Replication custom resource using the PVCGroup and network endpoint (from the previous steps) using the following command:
$ kubectl create -f <specification-file>
For example:
$ kubectl create -f dataservice_v1alpha1_replication_target_cr_ue.yaml
Ultima Enterprise on AWS as Target
The below steps are for the cluster configured on AWS and the Kubernetes service of type Load Balancer is used.
The sample specification is also available at /usr/share/diamanti/manifests/examples/dataservice/crs/
Update spec.selector ‘app’ with the value ‘<replication object name>target-rep1’ ‘<Rlink>target’ (After replication object name, append rlink name without any – or spcae).It is target-rep1target. The replication object name is the name that will be used to create a replication object in the later stage and the Rlink names can be obtained from replication specifications.
/usr/share/diamanti/manifests/examples/dataservice/crs/dataservice_svc_loadbalancer_aws.yaml
apiVersion: v1
kind: Service
metadata:
   name: target-service
   namespace: diamanti-system
annotations:
   service.beta.kubernetes.io/aws-load-balancer-type: "external"
   service.beta.kubernetes.io/aws-load-balancer-nlb-target-type: "instance"
   service.beta.kubernetes.io/aws-load-balancer-scheme: "internet-facing"
spec:
   selector:
      app: target-rep1target
   ports:
   - port: 9002 # it is a local port number of replication pod
   type: LoadBalancer
Wait for few minutes until the service acquires IP address of the Load Balancer. After that run the command below to note down the service IP address.
$ kubectl get svc target-service
Update the following fields in the specification file of Replication custom resource
remoteIPAddress: Combination of IP address of source cluster and the port separated by colon. schedule: The cron job schedule to configure replication interval pvcMap: The mapping of source and target PVCs.
/usr/share/diamanti/manifests/examples/dataservice/crs/dataservice_v1alpha1_replication_target_cr_ue.yaml
$ cat dataservice_v1alpha1_replication_target_cr_ue.yaml

apiVersion: dataservice.diamanti.com/v1alpha1
 kind: Replication
 metadata:
   name: target-rep1
   namespace: example-ns
   annotations:
     replicationDriver: diamanti/replication-driver:v3.6.0-ba5c12f
     imagePullPolicy: IfNotPresent
     spektra.diamanti.io/DSS-on-prem-cluster: "true"
     spektra.diamanti.io/DR-load-balancer: "true"
 spec:
   # Add fields here
     role: target
     pvcGroupName: target-pvcgroup
     pvcGroupNameSpace: example-ns
     snapshotPromotor: diamanti
     failoverPolicy: Automatic       #For future use
     failbackPolicy: Manual          #for future use
     rlinks:
       - rlinkName: target           #For future use
         schedule: "*/5 * * * *"
         localEndpoint: ":9002"
         remoteIpAddress: <Source Ip Address of service>:9001
         retainSnapshotsOnDeletion: true
         pvcMap:
            target-pvc1: 'source-pvc1'
            target-pvc2: 'source-pvc2'
         suspendReplication: false
Ultima Enterprise on VM/BM as Target
The sample specification is also available at /usr/share/diamanti/manifests/examples/dataservice/crs/ dataservice_svc_loadbalancer_external_ip.yaml
Update the following fields in the specification file of Kubernetes service.
app: The concatenated string ‘<replication object name>target-rep1’ ‘<Rlink>target’ (After replication object name, append rlink name without any – or spcae).It is “target-rep1target’. The replication object name is the name that will be used to create a replication object in the later stage and we can get the Rlink name from the replication specification.
externalIPs: Cluster VIP
apiVersion: v1
 kind: Service
 metadata:
   name: target-service
   namespace: diamanti-system
 spec:
   selector:
     app: target-rep1target
   ports:
   - port: 9002  #local port number of replication pod
   type: LoadBalancer
   externalIPs:
   - <IP of cluster VIP>
Update the following fields in the specification file of Replication custom resource
externalAddress: IP/hostname of Kubernetes Load Balancer service remoteIPAddress: Combination of IP address of source cluster and the port separated by colon. schedule: The cron job schedule to configure replication interval pvcMap: The mapping of source and target PVCs.
/usr/share/diamanti/manifests/examples/dataservice/crs/dataservice_v1alpha1_replication_target_cr_ue.yaml
$ cat dataservice_v1alpha1_replication_target_cr_ue.yaml

apiVersion: dataservice.diamanti.com/v1alpha1
 kind: Replication
 metadata:
   name: target-rep1
   namespace: example-ns
   annotations:
     replicationDriver: diamanti/replication-driver:v3.6.0-ba5c12f
     imagePullPolicy: IfNotPresent
     spektra.diamanti.io/DSS-on-prem-cluster: "true"
     spektra.diamanti.io/DR-load-balancer: "true"
 spec:
   # Add fields here
     role: target
     pvcGroupName: target-pvcgroup
     pvcGroupNameSpace: example-ns
     snapshotPromotor: diamanti
     failoverPolicy: Automatic       #For future use
     failbackPolicy: Manual          #for future use
     rlinks:
       - rlinkName: target           #For future use
         schedule: "*/5 * * * *"
         localEndpoint: ":9002"
         remoteIpAddress: <Source Ip Address of service>:9001
         retainSnapshotsOnDeletion: true
         pvcMap:
            target-pvc1: 'source-pvc1'
            target-pvc2: 'source-pvc2'
         suspendReplication: false
Ultima Enterprise on GCP (internal network for static route) as Target
The below steps are for the cluster configured with internal network and the static routes are configured and no Kubernetes service of type ClusterIP.
The sample specification files are also available at /usr/share/diamanti/manifests/examples/dataservice/crs/
Update spec.selector ‘app’ with the value ‘<replication object name>target’‘<Rlink> targettarget’ (After replication object name, append rlink name without any – or space).It is target-rep1target. Replication object names are used in the creation of replication objects later on and we can obtain the Rlink name from the replication specification.
externalIPs: - <one of the unused IP addresses from the range of static route IP addresses>
/usr/share/diamanti/manifests/examples/dataservice/crs/dataservice_svc_static_route_external_ip.yaml
 $ cat  dataservice_svc_static_route_external_ip.yaml

apiVersion: v1
 kind: Service
 metadata:
   name: target-service
   namespace: diamanti-system
 spec:
   selector:
     app: replication-object-label
   ports:
   - port: 9002  #front end port number for replication
     targetPort: 9005 #local port number of replication pod
   type: ClusterIP
   externalIPs:
   - <Unused IP from static route IP range>
Update the following fields in the specification file of Replication custom resource
remoteIPAddress: Combination of IP address of source cluster and the port separated by colon. schedule: The cron job schedule to configure replication interval pvcMap: The mapping of source and target PVCs.
/usr/share/diamanti/manifests/examples/dataservice/crs/dataservice_v1alpha1_replication_target_cr_ue.yaml
$ cat dataservice_v1alpha1_replication_target_cr_ue.yaml

apiVersion: dataservice.diamanti.com/v1alpha1
 kind: Replication
 metadata:
   name: target-rep1
   namespace: example-ns
   annotations:
     replicationDriver: diamanti/replication-driver:v3.6.0-ba5c12f
     imagePullPolicy: IfNotPresent
     spektra.diamanti.io/DSS-on-prem-cluster: "true"
     spektra.diamanti.io/DR-load-balancer: "true"
 spec:
   # Add fields here
     role: target
     pvcGroupName: target-pvcgroup
     pvcGroupNameSpace: example-ns
     snapshotPromotor: diamanti
     failoverPolicy: Automatic       #For future use
     failbackPolicy: Manual          #for future use
     rlinks:
       - rlinkName: target           #For future use
         schedule: "*/5 * * * *"
         localEndpoint: ":9005"
         remoteIpAddress: <source IP Address of service>:9001
         retainSnapshotsOnDeletion: true
         pvcMap:
            target-pvc1: 'source-pvc1'
            target-pvc2: 'source-pvc2'
         suspendReplication: false
Configure Source Cluster
Ultima Accelerator as Source
Create a static network endpoint in the diamanti-system namespace using the following command:
$ dctl endpoint create source-endpoint -n <network> -ns <namespace>
For example:
$ dctl endpoint create source-endpoint -n nw01 -ns diamanti-system
Update the following fields in the specification file of Replication custom resource
remoteIPAddress: Combination of IP address of static endpoint and the port separated by colon. schedule: The cron job schedule to configure replication interval
/usr/share/diamanti/manifests/examples/dataservice/crs/dataservice_v1alpha1_replication_source_cr.yaml
$ cat dataservice_v1alpha1_replication_source_cr.yaml

apiVersion: dataservice.diamanti.com/v1alpha1
 kind: Replication
 metadata:
   name: source-rep1
   namespace: example-ns
   annotations:
     replicationDriver: diamanti/replication-driver:v3.6.0-ba5c12f
     imagePullPolicy: IfNotPresent
     # Add the follwing annotation in case of openshift cluster
     # k8s.v1.cni.cncf.io/networks: ADDITIONAL_NETWORK_NAME
 spec:
   # Add fields here
     role: source
     pvcGroupName: source-pvcgroup
     pvcGroupNameSpace: diamanti-system
     snapshotPromotor: diamanti
     failoverPolicy: Automatic
     failbackPolicy: Manual
     rlinks:
       - rlinkName: source
         schedule: "*/2 * * * *"
         localEndpoint: source-endpoint:9001
         remoteIpAddress: <Target service IP Address>:9002
         pvcMap:
            source-pvc1: 'target-pvc1'
            source-pvc2: 'target-pvc2'
Create the Replication custom resource using the PVCGroup and network endpoint (from the previous steps) using the following command:
$ kubectl create -f <specification-file>
For example:
$ kubectl create -f dataservice_v1alpha1_replication_source_cr.yaml
Ultima Enterprise on GCP (with Load Balancer service for external and internal network) as Source
The sample specification is also available at /usr/share/diamanti/manifests/examples/dataservice/crs/
Update spec.selector ‘app’ with the value ‘<replication object name>source-rep1 ‘<Rlink>source’ (After replication object name, append rlink name without any – or space).It is “source-rep1source”’. The replication object name is the name that will be used to create a replication object in the later stage and we can obtain the Rlink name from the replication specification..
apiVersion: v1
kind: Service
metadata:
   name: source-service
   namespace: diamanti-system
spec:
   selector:
      app: source-rep1source
   ports:
      - port: 9001 #It is a local port number of replication pod

   type: LoadBalancer
Update the following fields in the specification file of Replication custom resource
remoteIPAddress: Combination of IP address of target cluster and the port separated by colon. schedule: The cron job schedule to configure replication interval pvcMap: The mapping of source and target PVCs.
/usr/share/diamanti/manifests/examples/dataservice/crs/dataservice_v1alpha1_replication_source_cr_ue.yaml
$ cat dataservice_v1alpha1_replication_source_cr_ue.yaml

apiVersion: dataservice.diamanti.com/v1alpha1
 kind: Replication
 metadata:
   name: source-rep1
   namespace: example-ns
   annotations:
     replicationDriver: diamanti/replication-driver:v3.6.0-ba5c12f
     imagePullPolicy: IfNotPresent
     spektra.diamanti.io/DSS-on-prem-cluster: "true"
     spektra.diamanti.io/DR-load-balancer: "true"
 spec:
   # Add fields here
     role: source
     pvcGroupName: source-pvcgroup
     pvcGroupNameSpace: example-ns
     snapshotPromotor: diamanti
     failoverPolicy: Automatic       #For future use
     failbackPolicy: Manual          #For future use
     rlinks:
       - rlinkName: source           #For future use
         schedule: "*/2 * * * *"
         localEndpoint: ":9001"
         remoteIpAddress: <Target Service IP Address>:9002
         pvcMap:
            source-pvc1: 'target-pvc1'
            source-pvc2: 'target-pvc2'
         suspendReplication: false
Create the Replication custom resource using the specification file.
$ kubectl create -f <specification-file>
For example:
$ kubectl create -f dataservice_v1alpha1_replication_source_cr_ue.yaml
Ultima Enterprise on AWS as Source
The below steps are for the cluster configured on AWS and the Kubernetes service of type Load Balancer is used.
The sample specification is also available at /usr/share/diamanti/manifests/examples/dataservice/crs/ dataservice_svc_loadbalancer_aws.yaml
Update spec.selector ‘app’ with the value ‘<replication object name>source-rep1 ‘<Rlink>source’ (After replication object name, append rlink name without any – or spcae).It is “source-rep1source”’. The replication object name is the name that will be used to create a replication object in the later stage and we can obtain the Rlink name from the replication specification..
apiVersion: v1
kind: Service
metadata:
   name: source-service
   namespace: diamanti-system
annotations:
   service.beta.kubernetes.io/aws-load-balancer-type: "external"
   service.beta.kubernetes.io/aws-load-balancer-nlb-target-type: "instance"
   service.beta.kubernetes.io/aws-load-balancer-scheme: "internet-facing"
spec:
   selector:
      app: source-rep1source
   ports:
      - port: 9001
   type: LoadBalancer
Wait for few minutes until the service acquires IP address of the Load Balancer. After that run the command below to note down the service IP address.
$ kubectl get svc source-service
Update the following fields in the specification file of Replication custom resource
remoteIPAddress: Combination of IP address of target cluster and the port separated by colon. schedule: The cron job schedule to configure replication interval pvcMap: The mapping of source and target PVCs.
/usr/share/diamanti/manifests/examples/dataservice/crs/dataservice_v1alpha1_replication_source_cr_ue.yaml
$ cat dataservice_v1alpha1_replication_source_cr_ue.yaml

apiVersion: dataservice.diamanti.com/v1alpha1
 kind: Replication
 metadata:
   name: source-rep1
   namespace: example-ns
   annotations:
     replicationDriver: diamanti/replication-driver:v3.6.0-ba5c12f
     imagePullPolicy: IfNotPresent
     spektra.diamanti.io/DSS-on-prem-cluster: "true"
     spektra.diamanti.io/DR-load-balancer: "true"
 spec:
   # Add fields here
     role: source
     pvcGroupName: source-pvcgroup
     pvcGroupNameSpace: example-ns
     snapshotPromotor: diamanti
     failoverPolicy: Automatic       #For future use
     failbackPolicy: Manual          #For future use
     rlinks:
       - rlinkName: source           #For future use
         schedule: "*/2 * * * *"
         localEndpoint: ":9001"
         remoteIpAddress: <Target Service IP Address>:9002
         pvcMap:
            source-pvc1: 'target-pvc1'
            source-pvc2: 'target-pvc2'
         suspendReplication: false
Create the Replication custom resource using the specification file.
$ kubectl create -f <specification-file>
For example:
$ kubectl create -f dataservice_v1alpha1_replication_source_cr_ue.yaml
Ultima Enterprise on Virtual Machine or BareMetal as Source
The sample specification is also available at /usr/share/diamanti/manifests/examples/dataservice/crs/
Update spec.selector ‘app’ with the value ‘<replication object name>source-rep1’ ‘<Rlink>source’ (After replication object name, append rlink name without any – or spcae).It is “source-rep1source”’. The replication object name is the name that will be used to create a replication object in the later stage and we can obtain the Rlink name from the replication specification.
/usr/share/diamanti/manifests/examples/dataservice/crs/dataservice_svc_loadbalancer_external_ip.yaml
$ cat dataservice_svc_loadbalancer_external_ip.yaml


   apiVersion: v1
   kind: Service
   metadata:
      name: source-service
      namespace: diamanti-system
   spec:
      selector:
         app: source-rep1source
      ports:
         - port: 9001
      type: LoadBalancer
      externalIPs:
      - <IP of Cluster VIP>
Update the following fields in the specification file of Replication custom resource
remoteIPAddress: Combination of IP address of target cluster and the port separated by colon. schedule: The cron job schedule to configure replication interval pvcMap: The mapping of source and target PVCs.
/usr/share/diamanti/manifests/examples/dataservice/crs/dataservice_v1alpha1_replication_source_cr_ue.yaml
$ cat dataservice_v1alpha1_replication_source_cr_ue.yaml

apiVersion: dataservice.diamanti.com/v1alpha1
 kind: Replication
 metadata:
   name: source-rep1
   namespace: example-ns
   annotations:
     replicationDriver: diamanti/replication-driver:v3.6.0-ba5c12f
     imagePullPolicy: IfNotPresent
     spektra.diamanti.io/DSS-on-prem-cluster: "true"
     spektra.diamanti.io/DR-load-balancer: "true"
 spec:
   # Add fields here
     role: source
     pvcGroupName: source-pvcgroup
     pvcGroupNameSpace: example-ns
     snapshotPromotor: diamanti
     failoverPolicy: Automatic       #For future use
     failbackPolicy: Manual          #For future use
     rlinks:
       - rlinkName: source           #For future use
         schedule: "*/2 * * * *"
         localEndpoint: ":9001"
         remoteIpAddress: <Target Service IP Address>:9002
         pvcMap:
            source-pvc1: 'target-pvc1'
            source-pvc2: 'target-pvc2'
         suspendReplication: false
Create the Replication custom resource using the specification file.
$ kubectl create -f <specification-file>
For example:
$ kubectl create -f dataservice_v1alpha1_replication_source_cr_ue.yaml
Ultima Enterprise on GCP (internal network for static route) as Source
The below steps are for the cluster configured with internal network for static route and the Kubernetes service of type ClusterIP is used.
The sample specification files are also available at /usr/share/diamanti/manifests/examples/dataservice/crs/
Update spec.selector ‘app’ with the value ‘<replication object name>source-rep1’ ‘<Rlink>source’ (After replication object name, append rlink name without any – or spcae).It is “source-rep1source”’. The replication object name is the name that will be used to create a replication object in the later stage and we can obtain the Rlink name from the replication specification.
/usr/share/diamanti/manifests/examples/dataservice/crs/dataservice_svc_static_route_external_ip.yaml
$ cat dataservice_svc_static_route_external_ip.yaml
externalIPs: - <one of the unused IP addresses from the range of static route IP addresses>
apiVersion: v1
kind: Service
metadata:
   name: source-service
   namespace: diamanti-system
spec:
   selector:
      app: source-rep1source
   ports:
      - port: 9001
      targetPort: 9005
   type: ClusterIP
   externalIPs:
   - <one of the unused IP addresses from the range of static route IP addresses>
Update the following fields in the specification file of Replication custom resource
remoteIPAddress: Combination of IP address of source cluster and the port separated by colon. schedule: The cron job schedule to configure replication interval pvcMap: The mapping of source and target PVCs.
/usr/share/diamanti/manifests/examples/dataservice/crs/dataservice_v1alpha1_replication_source_cr_ue.yaml
$ cat dataservice_v1alpha1_replication_source_cr_ue.yaml

apiVersion: dataservice.diamanti.com/v1alpha1
 kind: Replication
 metadata:
   name: source-rep1
   namespace: example-ns
   annotations:
     replicationDriver: diamanti/replication-driver:v3.6.0-ba5c12f
     imagePullPolicy: IfNotPresent
     spektra.diamanti.io/DSS-on-prem-cluster: "true"
     spektra.diamanti.io/DR-load-balancer: "true"
 spec:
   # Add fields here
     role: source
     pvcGroupName: source-pvcgroup
     pvcGroupNameSpace: example-ns
     snapshotPromotor: diamanti
     failoverPolicy: Automatic       #For future use
     failbackPolicy: Manual          #For future use
     rlinks:
       - rlinkName: source           #For future use
         schedule: "*/2 * * * *"
         localEndpoint: ":9005"
         remoteIpAddress: <Target Service IP Address>:9002
         pvcMap:
            source-pvc1: 'target-pvc1'
            source-pvc2: 'target-pvc2'
         suspendReplication: false
Create the Replication custom resource using the PVCGroup and network endpoint (from the previous steps) using the following command:
$ kubectl create -f <specification-file>
For example:
$ kubectl create -f dataservice_v1alpha1_replication_source_cr_ue.yaml
Configuring replication using the Graphical User Interface (GUI)
Part 1 Common configuration
Configuring target cluster
Creating PVC for target
Note
PVC size must be same for source and target.
To create PVC:
Select Storage Administration from the left menu and select Persistent Volume Claims.
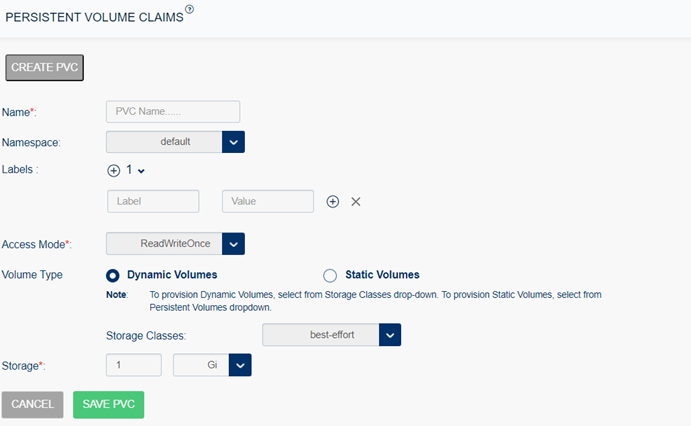
Select Create PVC and enter the following, and select Save:
Name: The name of the volume.
Namespace: Select the namespace from the list.
Labels: Use labels to identify common attributes shared among volumes.
Access Mode: Specifies to set the specific modes supported by that particular volume.The access modes are: ReadWriteOnce and ReadWriteMany.
Volume Type: It specifies the volume type that is being used. You can provision volumes either statically or dynamically for file-based storage.
Dynamic Volumes: To configure dynamic provisioning of volumes, define the Storage Class objects that describe QoS of storage.
Static Volume
Storage: The amount of storage allocated to this volume.
Creating PVC group
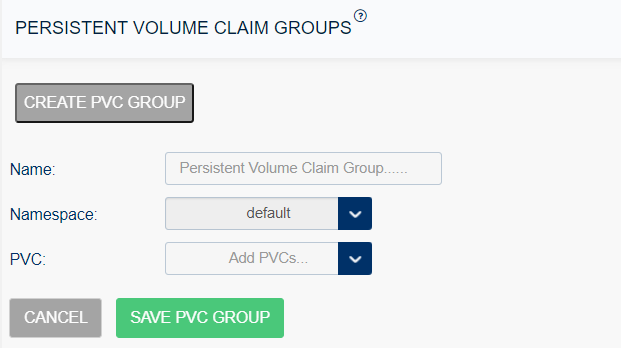
To create a PVC group:
Select Storage Administration from the left menu and select Persistent Volume Claim Group.
Select Create PVC Group and enter the following, and select Save PVC Group:
Name: The name of the volume group.
Namespace: Select the namespace from the list.
PVC: Select the target PVC from the list.
Configuring Source Cluster using GUI
You must create a PVC group using existing PVC on the source cluster used by the applications whose data is to be replicated.
Creating PVC group for source
To create a PVC group:
Select Storage Administration from the left menu and select Persistent Volume Claim Group.
Select Create PVC Group and enter the following, and select Save PVC Group:
Name: The name of the volume group.
Namespace: Select the namespace from the list.
PVC: Select the source PVC from the list.
Part 2 - Platform Specific Configuration
Creating Kubernetes service of a type load balancer
This service type creates load balancer on the cloud where the service is being created. The cloud provider can be AWS or GCP, and provides a public IP address to connect to the application.
You need to create a load balancer service for both Source and Target.
To create a load balancer service:
Select Create Applications from the left menu.
In the Deploy section select Upload a YAML or JSON file.
Select Import Spec, and browse the spec file (YAML file).
YAML file details
Following are the details of YAML file that needs to uploaded as a load balancer service for source and target cluster.
Target YAML file details
Note
Update spec.selector ‘app’ with the value ‘<replication object name>target-rep1 ‘<Rlink>target’ (After replication object name, append rlink name without any – or spcae).It is “target-rep1target”’. The replication object name is the name that will be used to create a replication object in the later stage and we can obtain the Rlink name from the replication specification
AWS as Target
apiVersion: v1
kind: Service
metadata:
   name: target-service
   namespace: diamanti-system
annotations:
   service.beta.kubernetes.io/aws-load-balancer-type: "external"
   service.beta.kubernetes.io/aws-load-balancer-nlb-target-type: "instance"
   service.beta.kubernetes.io/aws-load-balancer-scheme: "internet-facing"
spec:
   selector:
      app: target-rep1target
   ports:
   - port: 9002
   type: LoadBalancer
GCP as Target for internal and external network
apiVersion: v1
kind: Service
metadata:
   name: target-service
   namespace: diamanti-system
spec:
   selector:
      app: target-rep1target
   ports:
   - port: 9002
   type: LoadBalancer
GCP as Target for static route service
apiVersion: v1
kind: Service
metadata:
   name: target-service
   namespace: diamanti-system
spec:
   selector:
      app: target-rep1target
   ports:
      - port: 9002
      targetPort: 9005
   type: ClusterIP
   externalIPs:
   - <one of the unused IP addresses from the range of static route IP addresses>
VM/BM as Target
apiVersion: v1
kind: Service
metadata:
   name: target-service
   namespace: diamanti-system
spec:
   selector:
      app: target-rep1target
   ports:
   - port: 9002
   type: LoadBalancer
   externalIPs:
   - <IP of Cluster VIP>
Source YAML file details
Note
Update spec.selector ‘app’ with the value ‘<replication object name>source-rep1 ‘<Rlink>source’ (After replication object name, append rlink name without any – or spcae).It is “source-rep1source”’. The replication object name is the name that will be used to create a replication object in the later stage and we can obtain the Rlink name from the replication specification.
AWS as Source
apiVersion: v1
kind: Service
metadata:
   name: target-service
   namespace: diamanti-system
annotations:
   service.beta.kubernetes.io/aws-load-balancer-type: "external"
   service.beta.kubernetes.io/aws-load-balancer-nlb-target-type: "instance"
   service.beta.kubernetes.io/aws-load-balancer-scheme: "internet-facing"
spec:
   selector:
      app: source-rep1target
   ports:
      - port: 9001
   type: LoadBalancer
GCP as Source for internal and external network
apiVersion: v1
kind: Service
metadata:
   name: source-service
   namespace: diamanti-system
spec:
   selector:
      app: source-rep1source
   ports:
      - port: 9001
   type: LoadBalancer
GCP as Source for static route service
apiVersion: v1
kind: Service
metadata:
   name: source-service
   namespace: diamanti-system
spec:
   selector:
      app: source-rep1source
   ports:
      - port: 9001
      targetPort: 9005
   type: ClusterIP
   externalIPs:
   - <one of the unused IP addresses from the range of static route IP addresses>
VM or Bare metal as Source
apiVersion: v1
kind: Service
metadata:
   name: source-service
   namespace: diamanti-system
spec:
   selector:
      app: source-rep1source
   ports:
      - port: 9001
   type: LoadBalancer
   externalIPs:
   - <IP of Cluster VIP>
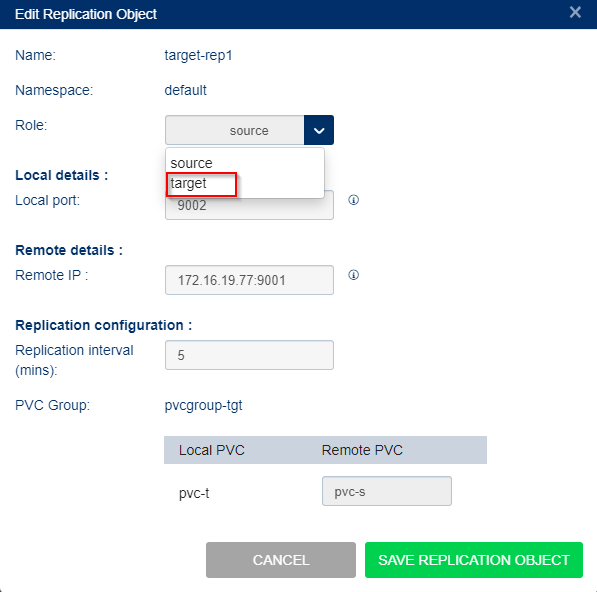
Creating replication object for target
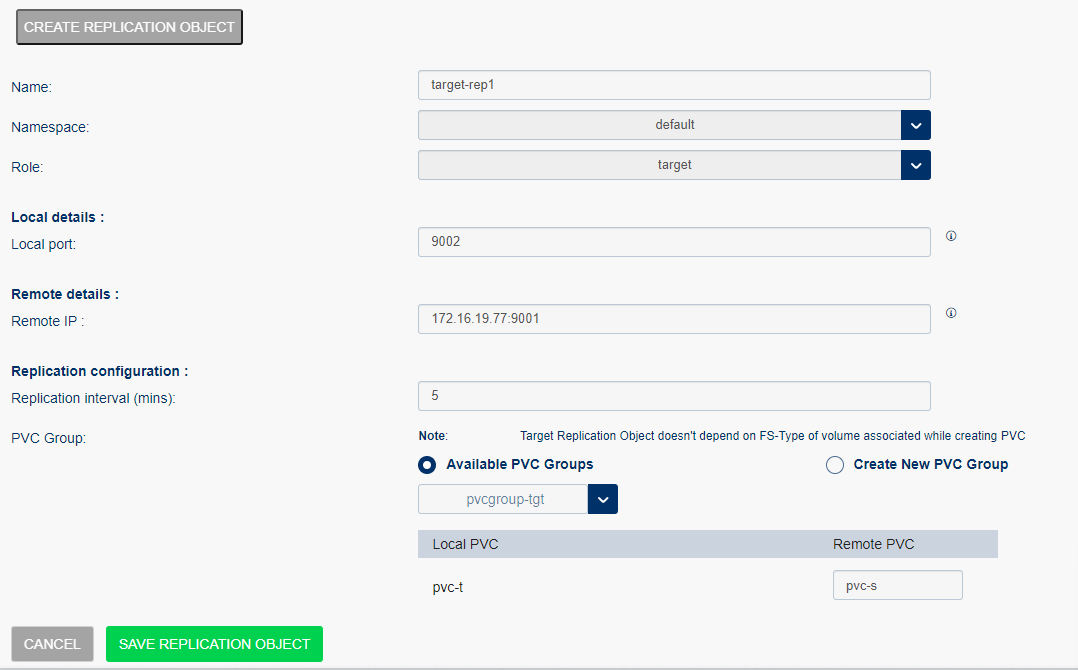
To create a replication object:
Select Storage Administration from the left menu and select Replication Objects.
Select Create Replication Object and enter the following, and select Save Replication Object:
Name: Specifies the replication object name.
Namespace: Select the namespace from the list.
Role: Specifies the endpoint. Select the target from the list, as the replication object is created for the target.
Local details:
Local port: Enter the local port number of the associated service.
Remote details
Remote IP: Enter the source service IP address and port number of the service. <remote service IP: port number>
Replication configuration
Replication interval(mins): Set the duration for the replication to occur. By default the replication interval is five minutes.
PVC group
Available PVC groups: Select the option if the PVC groups are already created. Once you select the option you must select the following:
Local PVC: Select the local/target PVC from the list.
Remote PVC: Enter the remote or source PVC to replicate objects.
Note that you are creating a replication object for target so the local will be target and the remote is the source.
Create New PVC Group: Create a new PVC group if it is not created.
Once you Save the configuration, the Replication Object is displayed in the list.
We can check the deployment pod logs after creating the replication object.
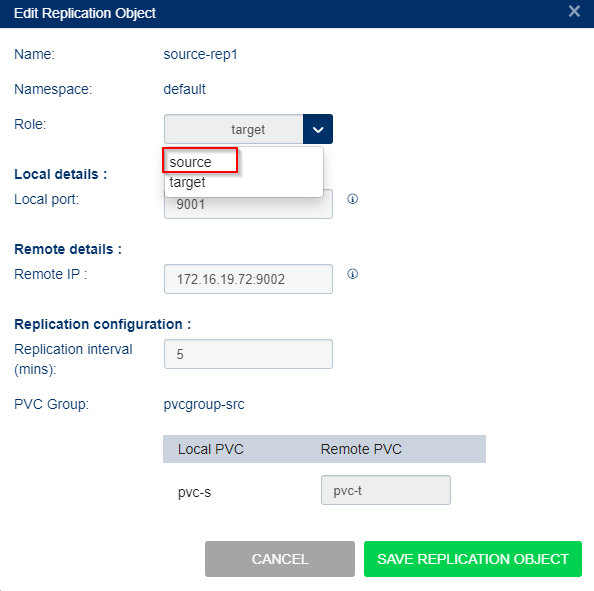
Creating replication object for the source
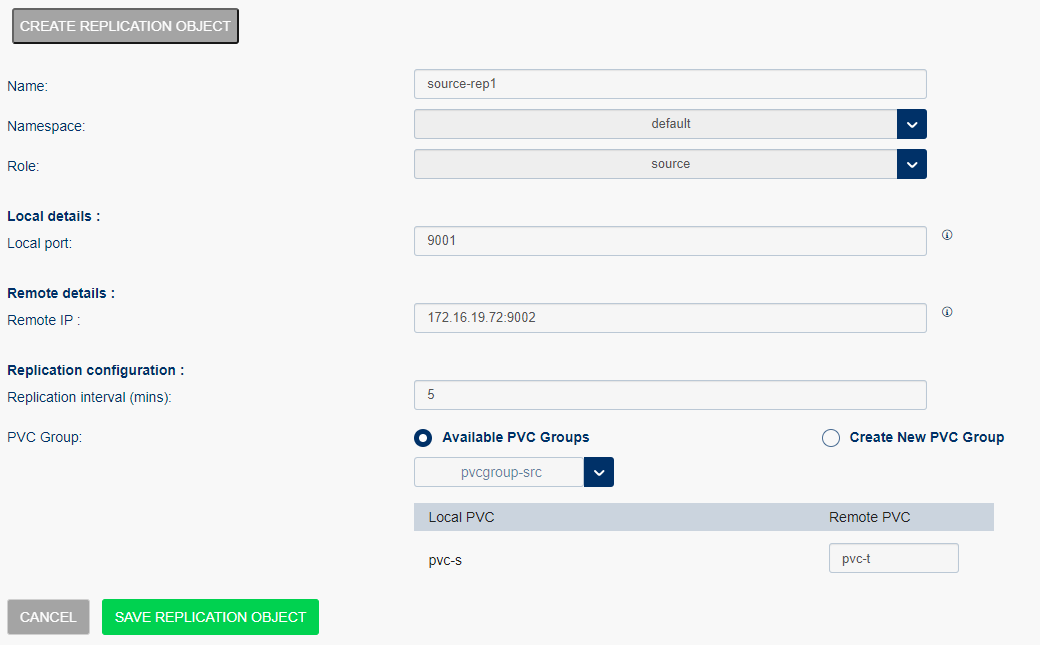
To create a replication object:
Select Storage Administration from the left menu and select Replication Objects.
Select Create Replication Object and enter the following, and select Save Replication Object:
Name: Specifies the replication object name.
Namespace: Select the namespace from the list.
Role: Specifies the endpoint. Select the source from the list, as the replication object is created for the source.
- Local details:
Local port: Enter the local port number of the associated service.
- Remote details
Remote IP: Enter the target service IP address of target and port number of service. <remote service IP: port number>
- Replication configuration
Replication interval(mins): Set the duration for the replication to occur. By default the replication interval is five minutes.
PVC group
Available PVC groups: Select the option if the PVC groups are already created. Once you select the option you must select the following:
Local PVC: Select the local/source PVC from the list.
Remote PVC: Enter the remote or target PVC to replicate objects.
Create New PVC Group: Create a new PVC group if it is not created.
Once you Save the configuration, the Replication Object is displayed in the list.
As soon as the replication object is created and the cronjob status is active, we can check the cronjob pod logs to see if replication has begun
Failover to Target side
In the event of disaster or DR drill, there would be a need to failover the applications to the target side. Below are the steps to failover on the target side.
To simulate the DR situation, stop the applications on source side who’s PVCs are configured in the replication and needs to be brought up on the target side.
After the applications are stopped and no more I/Os are happening, patch the source replication CR to change the role from source to target.
$ kubectl patch replications.dataservice.diamanti.com <Replication CR name> --type merge --patch '{"spec": { "role": "target"}}'
Example
$ kubectl patch replications.dataservice.diamanti.com <source-repl> --type merge --patch '{"spec": { "role": "target" }}'

replication.dataservice.diamanti.com/source-repl patched
Patch the target replication CR to change the role from target to source.
$ kubectl patch replications.dataservice.diamanti.com <Replication CR name> --type merge --patch '{"spec": { "role": "source" }}'
Example
$ kubectl patch replications.dataservice.diamanti.com <target-repl>  --type merge --patch '{"spec": { "role": "source" }}'

replication.dataservice.diamanti.com/target-repl patched
Deploy the application specification file on the target cluster. This application will use those PVCs and data till last snapshot is available.
Failover on the target cluster using GUI
If your source cluster is still alive and is accessible, it is recommended to stop the application before failing them over the destination cluster.
To enable failover of the source:
Select Storage Administration from the left menu and select Replication Objects.
From the list of objects, select the replication object name for the source to replicate to the target and vice versa. This will handle failover.
In the Actions column select edit icon.
- In the Edit replication Object dialog change the role:
from source to target
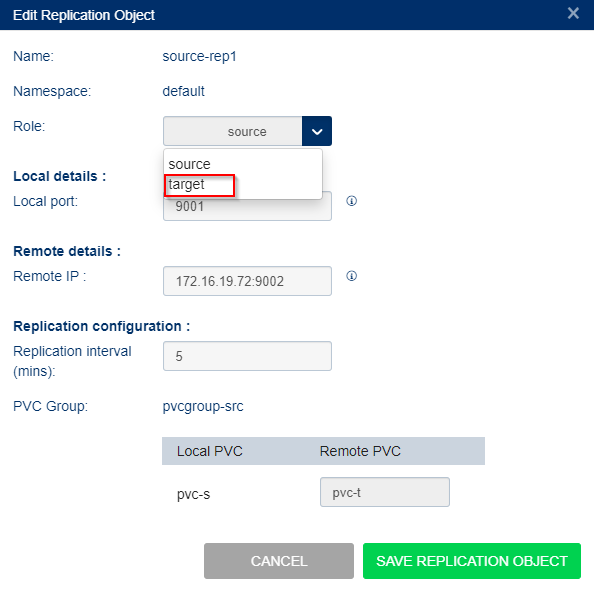
from target to source
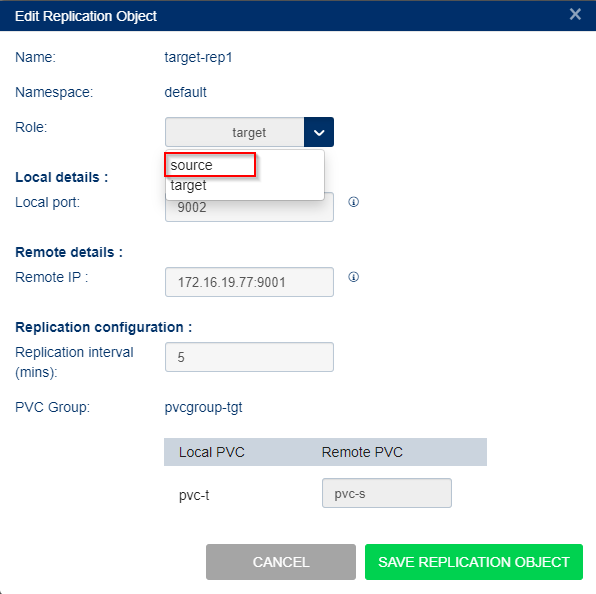
Failback to Source side
Failing back the application to the primary site involves copying the changed data back to the primary site from the target site. When you failback, you must revert to the default settings. You must stop the applications on new source (target) side whose PVCs are configured in the replication and needs to be brought up on the target (Original source)side. In order to change the replication role from source to target, patch the new source replication CR after the applications are stopped and no longer generating I/Os.
$ kubectl patch replications.dataservice.diamanti.com <Replication CR name> --type merge --patch '{"spec": { "role": "target"}}'
Example
$ kubectl patch replications.dataservice.diamanti.com <target-repl> --type merge --patch '{"spec": { "role": "target" }}'

replication.dataservice.diamanti.com/target-repl patched
Patch the new target replication CR to change the role from target to source.
$ kubectl patch replications.dataservice.diamanti.com <Replication CR name> --type merge --patch '{"spec": { "role": "source" }}'
Example
$ kubectl patch replications.dataservice.diamanti.com <source-repl>  --type merge --patch '{"spec": { "role": "source" }}'

replication.dataservice.diamanti.com/source-repl patched
Failback to source using GUI
To failback the application back to the primary site and make the site up and running again. In this case, copying change data from the target site back to the primary site.
To failback to the source site:
Select Storage Administration from the left menu and select Replication Objects.
From the list of objects, select the replication object name for the target. This will replicate to the source and will handle failback.
In the Actions column select edit icon.
In the Edit replication Object dialog change the role. In failback you must change the settings back to the original.
from source to target
from target to source
PVC Resize
The size of the PVC can only be increased as supported by Kubernetes. Below are the steps that needs to be performed both at source and the target side to resize the PVC.
Source side configuration
Before resizing the PVC, replication needs to be suspended. Edit replication’s cronjob to suspend the replication by changing the value of the field “spec.suspend” to true.
$ kubectl edit cronjob -n diamanti-system default-source-re-cronjob-2023-05-10t09-10-41z
Before changing the size of the PVC, verify the size of the PVC.
$ kubectl get pvc

NAME    STATUS   VOLUME                                     CAPACITY   ACCESS MODES   STORAGECLASS   AGE

pvc-s   Bound    pvc-358499e5-bb21-4650-9410-832e08595137   4Gi        RWO            best-effort    9h
Modify the size of PVC in the field resources.requests.storage by using the command below.
$ kubectl edit pvc pvc-s
"resources": {
   "requests": {
      "storage": "6Gi"
   }
Verify the new size of PVC.
$ kubectl get pvc

NAME    STATUS   VOLUME                                     CAPACITY   ACCESS MODES   STORAGECLASS   AGE

pvc-s   Bound    pvc-358499e5-bb21-4650-9410-832e08595137   6Gi        RWO            best-effort    9h
The change in size can also be verified at the volume level using the dctl command
$ dctl volume list

NAME                                               SIZE      NODE                    LABELS    PHASE     STATUS      ATTACHED-TO   DEVICE-PATH   PARENT                                             AGE

pvc-358499e5-bb21-4650-9410-832e08595137           6.45GB    [jadhav-n3 jadhav-n1]   <none>    -         Available                                                                                  0d:9h:45m
Target side configuration
Get the name of the deployment supporting replication.
$ kubectl get deployments -n diamanti-system

NAME                                                READY   UP-TO-DATE   AVAILABLE   AGE

csi-external-attacher                               1/1     1            1           10h

csi-external-provisioner                            1/1     1            1           10h

csi-external-resizer                                1/1     1            1           10h

csi-external-snapshotter                            1/1     1            1           10h

default-target-re-deployment-2023-05-10t08-45-24z   1/1     1            1           8h

diamanti-dataservice-operator                       1/1     1            1           10h

snapshot-controller                                 1/1     1            1           10h
Scale down the deployment to 0.
$ kubectl scale deployment default-target-re-deployment-2023-05-10t08-45-24z -n diamanti-system --replicas=0

deployment.apps/default-target-re-deployment-2023-05-10t08-45-24z scaled
Verify the pod associated with the deployment is deleted.
$ kubectl get pod -A | grep target
Notice the size of PVC before resizing it.
$ kubectl get pvc

NAME    STATUS   VOLUME                                     CAPACITY   ACCESS MODES   STORAGECLASS   AGE

pvc-t   Bound    pvc-38800700-65db-4dad-8638-61341cefed2d   4Gi        RWO            best-effort    10h
‘dctl volume list’ command can also be used to verify the size of the volume associated with the PVC.
$ dctl volume list

NAME                                       SIZE      NODE            LABELS    PHASE     STATUS      ATTACHED-TO   DEVICE-PATH   PARENT    AGE

pvc-38800700-65db-4dad-8638-61341cefed2d   4.33GB    [pj-n2 pj-n3]   <none>    -         Available                                         0d:10h:9m
Modify PVC to the new size
$ kubectl edit pvc pvc-t

persistentvolumeclaim/pvc-t edited
Below is the snippet of the yaml file getting edited for change in the size.
"spec": {

"accessModes": [

      "ReadWriteOnce"

],

"resources": {

      "requests": {

         "storage": "6Gi"

      }

},
Verify the change in size of PVC
$ kubectl get pvc

NAME    STATUS   VOLUME                                     CAPACITY   ACCESS MODES   STORAGECLASS   AGE

pvc-t   Bound    pvc-38800700-65db-4dad-8638-61341cefed2d   6Gi        RWO            best-effort    10h
Verify the change in size of volume.
$ dctl volume list

NAME                                       SIZE      NODE            LABELS    PHASE     STATUS      ATTACHED-TO   DEVICE-PATH   PARENT    AGE

pvc-38800700-65db-4dad-8638-61341cefed2d   6.45GB    [pj-n2 pj-n3]   <none>    -         Available                                         0d:10h:13m
Restart the deployment.
$ kubectl scale deployment default-target-re-deployment-2023-05-10t08-45-24z -n diamanti-system --replicas=1

deployment.apps/default-target-re-deployment-2023-05-10t08-45-24z scaled
Verify the pod associated with the deployment is started and is in Running state.
$ kubectl get pod -A | grep target

diamanti-system   default-target-re-deployment-2023-05-10t08-45-24z-545fcbbfqfdv8   1/1     Running   0          34s
Source side configuration
The replication that was suspended before the resize needs to be resumed. Edit cronjob to modify the field ‘Suspend’ to false.
$ kubectl edit cronjob -n diamanti-system   default-source-re-cronjob-2023-05-10t09-10-41z

cronjob.batch/default-source-re-cronjob-2023-05-10t09-10-41z edited
Verify the pod associated with the cronjob is started and is in Running state.
$ kubectl get pod -A | grep source

diamanti-system   default-source-re-cronjob-2023-05-10t09-10-41z-28062315-7x5rv   1/1     Running   0    4s    10.128.243.7   jadhav-n3   <none>    <none>
Resizing PVC using GUI
Stop the application available on the source cluster.
Select Application from the menu option.
On the POD Summary page, search the application and select Delete.
- Suspend the cron job.
Check cron job for the application available on the source cluster. Use the following command to check the cron job:
kubectl get cj –n <namespace>
Edit the cron job for the application and suspend it using the following command:
  Kubectl edit <cronjob name> -n <namespace of cron job>


Modify **Suspend** = **true**
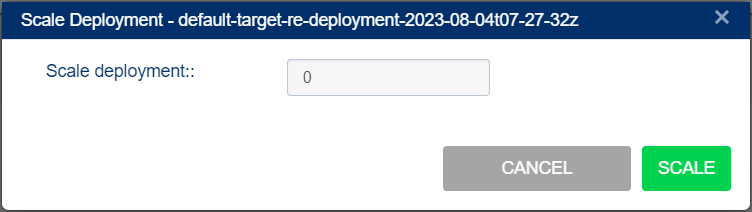
Scale down the cluster.
Select Applications from the menu and select Deployments.
Search for the target deployment on the Deployments page.
Select the Scale deployment in the Actions column to scale down the target cluster. Change the Scale deployment value to 0.
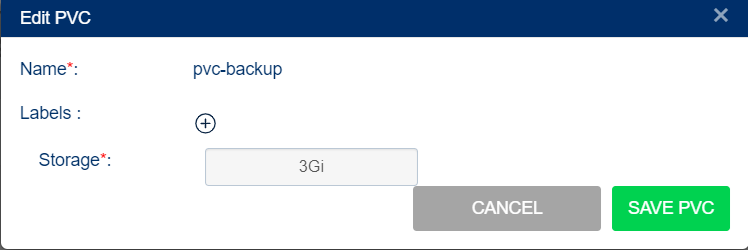
Increase the storage capacity of the source and target PVC.
Note
Ensure the Source and the target PVC are of the same storage capacity. You cannot decrease the storage capacity from the already set value.
Select Storage Administration from the menu.
Select Edit for the source and target PVC to increase the storage capacity, and select SAVE PVC.
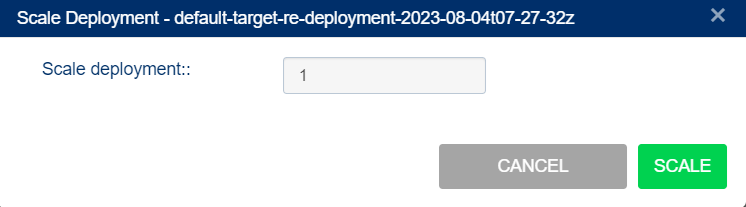
- Scale up the cluster.
Select Applications from the menu and select Deployments.
Search for the target deployment on the Deployments page.
Select the Scale deployment in the Actions column to scale up the target cluster. Change the Scale deployment value to 1.
Resume the cron job.
Check cron job for the application available on the source cluster. Use the following command to check the cron job:
kubectl get cj –n <namespace>
Edit the cron job for the application and resume it using the following command:
Kubectl edit <cronjob name> -n <namespace of cron job>
Modify Suspend = False
Start the application available on the source cluster.
Select Application from the menu option and navigate to the Pod and search for target deployment PODs. Select Log in the action cloumn and check if the server has started.
Now check the status if the cron job is active for the source cluster using the following command:
Kubectl get cj –A

diamanti@ip-172-31-1-204 ~]$ kubectl get cj -A

NAMESPACE         NAME                                             SCHEDULE      SUSPEND   ACTIVE   LAST SCHEDULE   AGE

diamanti-system   default-source-re-cronjob-2023-07-27t09-27-48z   */2 * * * *   False     1        44m             150m
Navigate to the Application page and check if the replication is started in the logs of cron job pod.
Explore the CLI
The Kubernetes CLI includes commands to do the following:
Create pvcgroup custom resources
Delete pvcgroup custom resources
Create replication custom resources
Check the replication status
Update replication custom resources
Delete replication custom resources
Create pvcgroup Custom Resources
Use the following command:
$kubectl create -f <specification-file>
For example:
$ kubectl create -f pvcgroup-cr.yaml
Delete pvcgroup Custom Resources
Use the following command:
$ kubectl delete pvcgroup -n
Create Replication Custom Resources
Use the following command:
$ kubectl create -f <specification-file>
For example:
$ kubectl create -f replication-cr.yaml
Check Replication Status
Use the following command:
$ kubectl describe replication <replication-object-name> -n <namespace>
Update Replication Custom Resources
Use the following command:
$ kubectl patch -f <specification-file>
For example:
$ kubectl patch -f replication-cr.yaml
This command supports the update of RPO, localEndpoint, and remoteIpAddress.
Delete Replication Custom Resources
Use the following command:
$ kubectl delete replication <replication-object-name> -n <namespace>
Troubleshoot Asynchronous Replication
This section describes how to troubleshoot asynchronous replication between Diamanti clusters.
Verify IP connectivity between the source and target systems. Do the following:
In case of UA, ping the localEndpoint IP address of the source replication CR from the target. For UE, check the reachability of the load balancer using the telnet command and the port.
In case of UA, ping the localEndpoint IP address of the target replication CR from the source. For UE, check the reachability of the load balancer using the telnet command and the port.
Verify that all PVCs in the target PVCGroup are exactly same size as the corresponding PVCs in the source PVCGroup.
Verify the correct mapping of PVCs in the source and target replication CR specification files. For instance, in the following example source replication CR specification, target-pvc1 is mapped to source-pvc1 and target-pvc2 is mapped to source-pvc2 on the remote (target).
pvcMap:
   source-pvc1: 'target-pvc1'
   source-pvc2: 'target-pvc2'
Verify the replication operation using the following command:
$ kubectl describe replication <replication-object-name> -n <namespace>
Check the replication driver log on the source, Do the following:
Find the cronjob corresponding to the replication object using the following command:
$ kubectl get cronjob -n diamanti-system
Examine the cronjob logs and the logs of the job created by cronjob (if the job is currently running) using the following commands:
$ kubectl logs <cronjob-name> -n diamanti-system kubectl logs <job-created-by-cronjob> -n diamanti-system
Check the replication driver log on the target. Do the following:
Find the deployment corresponding to the replication object using the following command:
$ kubectl get deployment -n diamanti-system
Examine the deployment logs using the following command:
$ kubectl logs <deployment-name>