Clusters
As a tenant admin user, you can view and perform operations on cluster.
A Kubernetes cluster is a set of nodes that run applications. It contains a control plane and one or more nodes. You can use the control plane to manage the cluster. Nodes run the applications and workloads.
You can use the cluster to schedule and run containers across a group of machines (virtual in the cloud). You must attach the existing Ultima Enterprise clusters.
Attaching tenant clusters when Domain is UA/UE-AWS/UE-GCP/UE-VM
The following matrix is supported for Domain and Tenant clusters:
Domain Cluster |
Tenant Cluster |
K8s Version |
|---|---|---|
Ultima Accelerator(UA) |
UA(3.7.0), UE-AWS(3.7.2), UE-GCP(3.7.2),UE-VM(3.7.2), GKE, OCP(4.12), EKS, and AKS |
1.27 |
EKS |
EKS |
1.27 |
GKE |
GKE |
1.27 |
UE-AWS |
UE-AWS (3.6.2) , EKS , GKE |
1.27 |
UE-GCP |
UE-GCP (3.6.2), EKS, GKE |
1.27 |
UE-BM |
UE-BM (3.7.2), UE-GCP(3.7.2), UA (3.7.0) |
1.27 |
AKS |
AKS |
1.27 |
Attaching UA/UE Cluster
Copy domain cert to all the master nodes of the tenant cluster.
Change the permission of the user as follows:
sudo chmod 0644 /etc/diamanti/certs/<*.crt>
ls -alrt /etc/diamanti/certs/<*.crt>
-rw-r----- 1 diamanti diamanti 1968 Jun  9 03:06 /etc/diamanti/certs/<*.crt>
[Note: Here diamanti is the user with which user installed UA cluster]
Setup OIDC configuration to the UA tenant cluster by logging in to every node:
Add  /etc/diamanti/certs/<*.crt>
Edit the KUBE_AUTHENTICATION settings from /etc/kubernetes/apiserver
--oidc-issuer-url=https://<fqdn>:5443/v1/identity/oidc
--oidc-username-claim=username
--oidc-groups-claim=groups
--oidc-client-id=kubernetes.local
--oidc-username-prefix=-
--oidc-ca-file=/etc/diamanti/certs/<*.crt>
Restart kubernetes API server: sudo systemctl restart apiserver.service
Make sure that apiserver.service is up and running.
Note
Master node should be the last one
Login to cluster using below command
dctl -s <vip> login -u <adminuser> -p <pwd>
Run the following script on your local system to generate the kubeconfig of the tenant cluster:
Note
Ensure the jq tool is installed before you run the script.
Currently, the script is supported only on linux OS.
#!/usr/bin/env bash
# script was taken from https://gist.github.com/innovia/fbba8259042f71db98ea8d4ad19bd708 and adjusted with "apply_rbac" function and colorized output
#set -e
#set -o pipefail
# Colors
RED="\e[01;31m"
GREEN="\e[01;32m"
YELLOW="\e[01;33m"
BLUE="\e[01;34m"
COLOROFF="\e[00m"
usage() {
  echo ""
  echo "Script to create Spektra SA and kubeconfig to use for attachment."
  echo ""
  echo "Usage: $0 [-k <kubeconfig>] [-n <namespace>] [-u <sa-account-name>][-f <filename>]" 1>&2;
  echo "  -f <filename>   -> kubeconfig output filename"
  echo "  -n <namespace>> -> Namespace to use for SA Account Creation (default: spektra-system)"
  echo "  -u <username>   -> Service Account Name (default: spektra-admin)"
  exit 1;
}
while getopts ":k:f:n:u:" o; do
    case "${o}" in
        k)
            KUBECONFIG=${OPTARG}
            ;;
        f)
            KUBECFG_FILE=${OPTARG}
            ;;
        n)
            NAMESPACE=${OPTARG}
            ;;
        u)
            SERVICE_ACCOUNT_NAME=${OPTARG}
            ;;
        *)
            usage
            ;;
    esac
done
shift $((OPTIND-1))
export KUBECONFIG=${KUBECONFIG:-${HOME}/.kube/config}
SERVICE_ACCOUNT_NAME=${SERVICE_ACCOUNT_NAME:-spektra-admin}
NAMESPACE=${NAMESPACE:-spektra-system}
KUBECFG_FILE_NAME=${KUBECFG_FILE_NAME:-spektra-admin.kubeconfig}
TARGET_FOLDER=$(mktemp -d -t spektra.XXX)
KUBECFG=${TARGET_FOLDER}/${KUBECFG_FILE_NAME}
SECRET_FILE_NAME="/tmp/$SERVICE_ACCOUNT_NAME-secret.yaml"
get_kubernetes_version() {
    K8S_MINOR_VERSION=`kubectl version -ojson | jq '.serverVersion.minor'`
    K8S_MINOR_VERSION="${K8S_MINOR_VERSION%\"}"
    K8S_MINOR_VERSION="${K8S_MINOR_VERSION#\"}"
    if [[ $K8S_MINOR_VERSION == *"+"* ]]; then
        K8S_MINOR_VERSION="${K8S_MINOR_VERSION%+}"
    fi
    echo $K8S_MINOR_VERSION
}
create_serviceaccount_secret() {
    K8S_MINOR_VERSION=$(get_kubernetes_version)
    SECRET_NAME=$SERVICE_ACCOUNT_NAME-secret
    if [ $K8S_MINOR_VERSION -gt 23 ]; then
        kubectl get secret ${SECRET_NAME} -n ${NAMESPACE}
        if [ $? -eq 0 ]; then
            echo -e "\\nSecret already exists. Moving on."
        else
            echo "k8s server version is greater than 1.23, secrets doesn't get created for serviceaccount by default"
            echo -e "\\nCreating secret/${SECRET_NAME} for serviceaccount/${SERVICE_ACCOUNT_NAME}"
echo """
---
apiVersion: v1
kind: Secret
type: kubernetes.io/service-account-token
metadata:
  namespace: ${NAMESPACE}
  name: ${SECRET_NAME}
  annotations:
    kubernetes.io/service-account.name: ${SERVICE_ACCOUNT_NAME}
""" > ${SECRET_FILE_NAME}
            cat ${SECRET_FILE_NAME}
            kubectl create -f ${SECRET_FILE_NAME}
        fi
    fi
}
create_target_folder() {
    echo "Creating temporary directory to hold files: ${TARGET_FOLDER}"
    mkdir -p "${TARGET_FOLDER}"
}
create_namespace() {
    kubectl get namespace spektra-system
    if [ $? -eq 0 ]; then
        echo -e "\\nNamespace already exists. Moving on."
    else
        echo -e "\\nCreating namespace ${NAMESPACE}"
        kubectl create namespace "${NAMESPACE}"
    fi
}
create_service_account() {
    kubectl get sa ${SERVICE_ACCOUNT_NAME} -n ${NAMESPACE}
    if [ $? -eq 0 ]; then
        echo -e "\\nService Account already exists. Moving on."
    else
        echo -e "\\nCreating Service Account ${SERVICE_ACCOUNT_NAME} in namespace ${NAMESPACE}"
        kubectl create sa "${SERVICE_ACCOUNT_NAME}" --namespace "${NAMESPACE}"
    fi
    create_serviceaccount_secret
}
get_secret_name_from_service_account() {
    K8S_MINOR_VERSION=$(get_kubernetes_version)
    if [ $K8S_MINOR_VERSION -gt 23 ]; then
        SECRET_NAME=$SERVICE_ACCOUNT_NAME-secret
    else
        echo -e "\\nGetting secret of service account ${SERVICE_ACCOUNT_NAME} on ${NAMESPACE}"
        SECRET_NAME=$(kubectl get sa "${SERVICE_ACCOUNT_NAME}" --namespace="${NAMESPACE}" -o json | jq .secrets[]   | jq  -r ."name" | grep  "token")
    fi
    echo "\nSecret name: ${SECRET_NAME}"
}
extract_ca_crt_from_secret() {
    echo -e -n "\\nExtracting ca.crt from secret..."
    kubectl get secret --namespace "${NAMESPACE}" "${SECRET_NAME}" -o json | jq \
    -r '.data["ca.crt"]' | base64 -d > "${TARGET_FOLDER}/ca.crt"
    printf "done"
}
get_user_token_from_secret() {
    echo -e -n "\\nGetting user token from secret..."
    USER_TOKEN=$(kubectl get secret --namespace "${NAMESPACE}" "${SECRET_NAME}" -o json | jq -r '.data["token"]' | base64 -d)
    printf "done"
}
set_kube_config_values() {
    context=$(kubectl config current-context)
    echo -e "\\nSetting current context to: $context"
    CLUSTER_NAME=$(kubectl config get-contexts "$context" | awk '{print $3}' | tail -n 1)
    echo "Cluster name: ${CLUSTER_NAME}"
    ENDPOINT=$(kubectl config view \
    -o jsonpath="{.clusters[?(@.name == \"${CLUSTER_NAME}\")].cluster.server}")
    echo -e ${BLUE} "Endpoint: ${ENDPOINT} ${COLOROFF}"
    # Set up the config
    echo -e "\\nPreparing k8s-${SERVICE_ACCOUNT_NAME}-${NAMESPACE}-conf"
    echo -n "Setting a cluster entry in kubeconfig..."
    kubectl config set-cluster "${CLUSTER_NAME}" \
    --kubeconfig="${KUBECFG}" \
    --server="${ENDPOINT}" \
    --certificate-authority="${TARGET_FOLDER}/ca.crt" \
    --embed-certs=true
    echo -n "Setting token credentials entry in kubeconfig..."
    kubectl config set-credentials \
    "${SERVICE_ACCOUNT_NAME}" \
    --kubeconfig="${KUBECFG}" \
    --token="${USER_TOKEN}"
    echo -n "Setting a context entry in kubeconfig..."
    kubectl config set-context \
    "${CLUSTER_NAME}:${SERVICE_ACCOUNT_NAME}:${NAMESPACE}" \
    --kubeconfig="${KUBECFG}" \
    --cluster="${CLUSTER_NAME}" \
    --user="${SERVICE_ACCOUNT_NAME}" \
    --namespace="${NAMESPACE}"
    echo -n "Setting the current-context in the kubeconfig file..."
    kubectl config use-context "${CLUSTER_NAME}:${SERVICE_ACCOUNT_NAME}:${NAMESPACE}" \
    --kubeconfig="${KUBECFG}"
}
generate_rbac() {
    echo "Generating RBAC file..."
    cat << EOF > $TARGET_FOLDER/rbac.yaml
apiVersion: rbac.authorization.k8s.io/v1
kind: ClusterRoleBinding
metadata:
  name: spektra-admin
roleRef:
  apiGroup: rbac.authorization.k8s.io
  kind: ClusterRole
  name: cluster-admin
subjects:
- kind: ServiceAccount
  name: $SERVICE_ACCOUNT_NAME
  namespace: $NAMESPACE
EOF
    echo "done"
}
apply_rbac() {
    echo -e -n "\\nApplying RBAC permissions..."
    kubectl apply -f $TARGET_FOLDER/rbac.yaml
    printf "done"
}
save_kubeconfig() {
   cp ${KUBECFG} ./
   echo "Kubeconfig for the new service account can be found in ./${KUBECFG_FILE_NAME}"
}
cleanup() {
  rm -rf $TARGET_FOLDER
}
create_target_folder
create_namespace
create_service_account
generate_rbac
apply_rbac
get_secret_name_from_service_account
extract_ca_crt_from_secret
get_user_token_from_secret
set_kube_config_values
save_kubeconfig
echo -e "\\nAll done!"
Note
You must run the cluster login and create the spektra service account script on the same computer. Once the script is executed, it creates a kubeconfig file called ./spektra-admin.kubeconfig. If you have generated spektra-admin.kubeconfig on a non-local machine, you must copy it to the local machine.
Log in to the tenant as tenant admin.
Navigate to Attach Cluster -> Select Kubeconfig file spektra-admin.kubeconfig
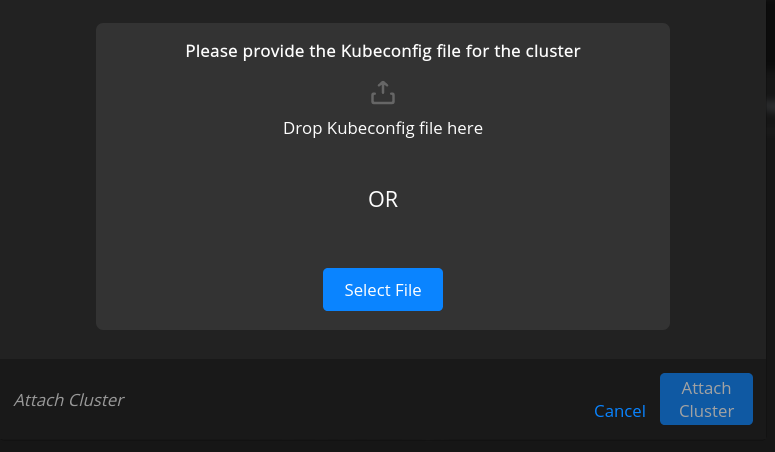
Select Attach Cluster.
Note
Ensure you run the diamanti-object-migration.sh --all script from node to view the available network on all applicable clusters.
When you attach a domain cluster, it creates a service account (on the tenant cluster) with cluster admin access. This service account is a fail-safe for the tenant admin. The RBAC for this service account gives the tenant admin cluster-admin permissions. Usually, the tenant admin has privileges within the tenant namespace in the domain cluster. However, attaching the domain cluster makes the tenant admin cluster-admin of the domain cluster.
Attaching a domain cluster to be used as a tenant cluster is allowed. However, it is not intended to be used when you need strict isolation between tenants.
Attaching GKE Cluster
Pre-requiste for GKE cluster:
GKE cluster should be of version k8s 1.27.
Node should be atleaset bare min E2 Standard-4 [4 vcpu and 16 GB Memory]
Cluster should have OIDC configuration enable. If not follow below steps:
Login into gcould through CLI.
gcloud components install anthos-auth
gcloud container clusters update <cluster-name> –zone=<zone-name> –enable-identity-service
Convert your <.crt> to base64. Command to do that is cat $CA_CERT_FILE | base64 -w 0
Create client-config-patch.yaml as per below:
spec:
 authentication:
 - name: oidc
   oidc:
    clientID: kubernetes.local
    certificateAuthorityData: "cat <*.crt> | base64 -w 0"
    issuerURI: https://<fqdn>:5443/v1/identity/oidc
    cloudConsoleRedirectURI: https://console.cloud.google.com/kubernetes/oidc
    kubectlRedirectURI: https://<fqdn>:5443
    userClaim: username
    groupsClaim: groups
    userPrefix: "-"
kubectl patch clientconfig default -n kube-public –type merge –patch-file /tmp/client-config-patch.yaml
Check the log for gke-oidc-service. If everything is fine it will look like as below:
I0602 11:07:16.550213      37 oidc_client.cc:253] Starting JWKs refresh cycle for: https://<fqdn>:5443/v1/identity/oidc/.well-known/openid-configuration
I0602 11:07:16.821173      37 oidc_client.cc:181] Fetched Discovery Document from https://<fqdn>:5443/v1/identity/oidc/.well-known/openid-configuration
Note
Here fqdn will be domain cluster and certificate will be in base64 format
Run the following script on your local computer
$ ./create_spektra_service_account.sh

    Creating temporary directory to hold files: /tmp/spektra.dVG
    Error from server (NotFound): namespaces "spektra-system" not found
    Creating namespace spektra-system
    namespace/spektra-system created
    Error from server (NotFound): serviceaccounts "spektra-admin" not found
    Creating Service Account spektra-admin in namespace spektra-system
    serviceaccount/spektra-admin created
    Generating RBAC file...
    done
    Applying RBAC permissions...clusterrolebinding.rbac.authorization.k8s.io/spektra-admin created
    done
    Getting secret of service account spektra-admin on spektra-system
    Secret name: spektra-admin-token-glwn8

    Extracting ca.crt from secret...done
    Getting user token from secret...done
    Setting current context to: <clustername>-c1:admin:default
    Cluster name: <clustername>
    Endpoint: https://192.51.100.100:5443
    Preparing k8s-spektra-admin-spektra-system-conf
    Setting a cluster entry in kubeconfig...Cluster "<cluster-name>" set.
    Setting token credentials entry in kubeconfig...User "spektra-admin" set.
    Setting a context entry in kubeconfig...Context "<cluster-name>:spektra-admin:spektra-system" created.
    Setting the current-context in the kubeconfig file...Switched to context "<cluster-name>:spektra-admin:spektra-system".
    Kubeconfig for the new service account can be found in ./spektra-admin.kubeconfig
    All done!
Note
Login to cluster and the spektra service account need to be run on the same machine or the ~/.kube/conf file needs to be copied from the login environment to the local computer environment.
Log in as the newly created tenant admin.
Select Attach Cluster and then select Kubeconfig file created in above step which is spektra-admin.kubeconfig
Select Attach Cluster.
Attaching EKS Cluster
EKS cluster Requirement:
EKS cluster must be version K8S 1.27
The node should be min t3.xlarge [4 vcpu and 16 GB Memory]
Cluster should have OIDC configuration enable. If not follow below steps:
Login to eks cluster using cli and run the below command to enable identity.
    Below is the sample eks-domain-cluster-oidc.yaml:

    apiVersion: eksctl.io/v1alpha5
    kind: ClusterConfig
    metadata:
      name: <eks-tenant-cluster-name>
      region: <region-name>
    identityProviders:
    - name: <eks-tenant-cluster-name>
      type: oidc
      issuerUrl: https://<spektra-fqdn>:5443/v1/identity/oidc
      clientId: kubernetes.local
      usernameClaim: username
      groupsClaim: groups

  Associate identityProviders with below command:

    eksctl associate identityprovider -f /tmp/eks-domain-cluster-oidc.yaml


.. note:: Here fqdn is the domain cluster and certificate is in base64 format.
Run the following script on your local computer
$ ./create_spektra_service_account.sh

    Creating temporary directory to hold files: /tmp/spektra.dVG
    Error from server (NotFound): namespaces "spektra-system" not found
    Creating namespace spektra-system
    namespace/spektra-system created
    Error from server (NotFound): serviceaccounts "spektra-admin" not found
    Creating Service Account spektra-admin in namespace spektra-system
    serviceaccount/spektra-admin created
    Generating RBAC file...
    done
    Applying RBAC permissions...clusterrolebinding.rbac.authorization.k8s.io/spektra-admin created
    done
    Getting secret of service account spektra-admin on spektra-system
    Secret name: spektra-admin-token-glwn8

    Extracting ca.crt from secret...done
    Getting user token from secret...done
    Setting current context to: <clustername>-c1:admin:default
    Cluster name: <clustername>
    Endpoint: https://192.51.100.100:5443
    Preparing k8s-spektra-admin-spektra-system-conf
    Setting a cluster entry in kubeconfig...Cluster "<cluster-name>" set.
    Setting token credentials entry in kubeconfig...User "spektra-admin" set.
    Setting a context entry in kubeconfig...Context "<cluster-name>:spektra-admin:spektra-system" created.
    Setting the current-context in the kubeconfig file...Switched to context "<cluster-name>:spektra-admin:spektra-system".
    Kubeconfig for the new service account can be found in ./spektra-admin.kubeconfig
    All done!
Note
Login to cluster and the spektra service account need to be run on the same machine or the ~/.kube/conf file needs to be copied from the login environment to the local computer environment.
Log in as the newly created tenant admin.
Select Attach Cluster and then select Kubeconfig file created in above step which is “spektra-admin.kubeconfig”
Select Attach Cluster.
Attaching tenant clusters when domain is GKE
Attach GKE cluster to the Spektra cluster when spektra is deployed GKE.
The following are the GKE cluster requirement:
A GKE cluster should have the K8S 1.27 version.
There should be at least one worker node with a minimum configuration of E2-Standard-4 [4 VCPU and 16GB Memory].
- Cluster should have OIDC configuration enable. If not follow below steps: Ensure that OIDC configuration is enabled for the cluster.
In case OIDC configuration is not enabled, follow these steps:
Login into gcloud using command line interface.
Run the following command for the gcloud components to install
anthos-authgcloud container clusters update <cluster-name> --enable-identity-service
Create tenant-client-config-patch.yaml:
spec:
 authentication:
 - name: oidc
   oidc:
    clientID: kubernetes.local
    certificateAuthorityData: "<CA_CERT_FILE_BASE64>"
    issuerURI: https://<fqdn>:5443/v1/identity/oidc
    cloudConsoleRedirectURI: https://console.cloud.google.com/kubernetes/oidc
    kubectlRedirectURI: https://<FQDN>:5443
    userClaim: username
    groupsClaim: groups
    userPrefix: "-"


 CA_CERT_FILE_BASE64 is the base64 for the same .crt used whike creating the domain.
 FQDN is the spektra fqdn used while creating a domain.
Run the following command to patch the
clientconfig:$ kubectl patch clientconfig default -n kube-public --type merge --patch-file tenant-client-config-patch.yaml
Check the log for
gke-oidc-service. If OIDC authentication is successful, it displays the following in the logs:
I0609 11:09:30.320164      14 plugin_list.h:139] OIDC_AUTHENTICATION[0] started.
I0609 11:09:30.320298      35 oidc_client.cc:253] Starting JWKs refresh cycle for: https://<fqdn>:5443/v1/identity/oidc/.well-known/openid-configuration
I0609 11:09:30.346726      14 operator.cc:319] Completed Patch request for default status: Auth methods in generation 2 applied; Ready for requests.
I0609 11:09:30.352917      35 oidc_client.cc:181] Fetched Discovery Document from https://<fqdn>:5443/v1/identity/oidc/.well-known/openid-configuration
Note
FWQDN refers to a domain cluster FWQDN, and certificate refers to a base64-format certificate.
Run the following script on your local computer to create a service account and set RBAC rules.
$ ./create_spektra_service_account.sh

  Creating temporary directory to hold files: /tmp/spektra.dVG
  Error from server (NotFound): namespaces "spektra-system" not found
  Creating namespace spektra-system
  namespace/spektra-system created
  Error from server (NotFound): serviceaccounts "spektra-admin" not found
  Creating Service Account spektra-admin in namespace spektra-system
  serviceaccount/spektra-admin created
  Generating RBAC file...
  done
  Applying RBAC permissions...clusterrolebinding.rbac.authorization.k8s.io/spektra-admin created
  done
  Getting secret of service account spektra-admin on spektra-system
  Secret name: spektra-admin-token-glwn8

  Extracting ca.crt from secret...done
  Getting user token from secret...done
  Setting current context to: <clustername>-c1:admin:default
  Cluster name: <clustername>
  Endpoint: https://192.51.100.100:5443
  Preparing k8s-spektra-admin-spektra-system-conf
  Setting a cluster entry in kubeconfig...Cluster "<cluster-name>" set.
  Setting token credentials entry in kubeconfig...User "spektra-admin" set.
  Setting a context entry in kubeconfig...Context "<cluster-name>:spektra-admin:spektra-system" created.
  Setting the current-context in the kubeconfig file...Switched to context "<cluster-name>:spektra-admin:spektra-system".

  Kubeconfig for the new service account can be found in ./spektra-admin.kubeconfig

  All done!
Note
Login to cluster and the spektra service account need to be run on the same machine or the ~/.kube/conf file needs to be copied from the login environment to the local computer environment.
Log in to spektra UI as the new tenant admin.
Select the Cluster in the menu, then select Attach Cluster from the right pane. and then select
Kubeconfigfile.
Select Attach Cluster.
Attaching tenant Clusters when Domain is EKS
EKS cluster Requirement:
EKS cluster should be of version K8S 1.27
Node should be at least bare min t3.xlarge [4 vcpu and 16 GB Memory]
Cluster should have OIDC configuration enable. If not follow below steps:
Login into eks cluster using cli and run the below command to enable identity.
  Below is the sample eks-domain-cluster-oidc.yaml:

  apiVersion: eksctl.io/v1alpha5
  kind: ClusterConfig
  metadata:
    name: <eks-tenant-cluster-name>
    region: <region-name>
  identityProviders:
  - name: <eks-tenant-cluster-name>
    type: oidc
    issuerUrl: https://<spektra-fqdn>:5443/v1/identity/oidc
    clientId: kubernetes.local
    usernameClaim: username
    groupsClaim: groups

Associate identityProviders with below command:

  eksctl associate identityprovider -f /tmp/eks-domain-cluster-oidc.yaml
Note
Here fqdn will be domain cluster and certificate will be base64 format
Run the following script on your local computer
$ ./create_spektra_service_account.sh

    Creating temporary directory to hold files: /tmp/spektra.dVG
    Error from server (NotFound): namespaces "spektra-system" not found
    Creating namespace spektra-system
    namespace/spektra-system created
    Error from server (NotFound): serviceaccounts "spektra-admin" not found
    Creating Service Account spektra-admin in namespace spektra-system
    serviceaccount/spektra-admin created
    Generating RBAC file...
    done
    Applying RBAC permissions...clusterrolebinding.rbac.authorization.k8s.io/spektra-admin created
    done
    Getting secret of service account spektra-admin on spektra-system
    Secret name: spektra-admin-token-glwn8

    Extracting ca.crt from secret...done
    Getting user token from secret...done
    Setting current context to: <clustername>-c1:admin:default
    Cluster name: <clustername>
    Endpoint: https://192.51.100.100:5443
    Preparing k8s-spektra-admin-spektra-system-conf
    Setting a cluster entry in kubeconfig...Cluster "<cluster-name>" set.
    Setting token credentials entry in kubeconfig...User "spektra-admin" set.
    Setting a context entry in kubeconfig...Context "<cluster-name>:spektra-admin:spektra-system" created.
    Setting the current-context in the kubeconfig file...Switched to context "<cluster-name>:spektra-admin:spektra-system".
    Kubeconfig for the new service account can be found in ./spektra-admin.kubeconfig
    All done!
Note
Login to cluster and the spektra service account need to be run on the same machine or the ~/.kube/conf file needs to be copied from the login environment to the local computer environment.
Log in as the newly created tenant admin.
Select the Attach Cluster -> Select Kubeconfig file created in above step which is spektra-admin.kubeconfig
Select Attach Cluster.
Attaching tenant clusters when domain is AKS
Creating the AKS tenant cluster and configuring OIDC
Run the following command to create the AKS cluster and configure OIDC for Spektra.
Note
Use the same SSL certificate that is used to create domain cluster while creating tenant cluster.
./aks-cluster.sh <cluster_name> create -s <FQDN of domain:port> -c <CA_Certficate_Private_CertFileName>,<CA_Certficate_Private_KeyFileName> -C <CA_Certficate_Public_CertFileName> -b v3.8.0-16 -d
Parameter |
Description |
|---|---|
<clustername> |
Specifies the cluster name. |
<operation> |
Specifies the operation as create, delete or configure-OIDC. |
-s |
Spektra fully qualified domain name. For example, spektra-ocpcluster.ocp.diamanti.com:5443 |
-b |
Spektra build version. |
-c |
CA private cert and key pair. |
-C |
CA Public SSL certificate. |
Configuring OIDC on existing AKS tenant cluster
Run the following command to configure the already created AKS cluster and Spektra domain is already configured.
./aks-cluster.sh <cluster_name> configure -s <FQDN of domain:port> -c <CA_Certficate_Private_CertFileName>,<CA_Certficate_Private_KeyFileName> -C <CA_Certficate_Public_CertFileName> -b v3.8.0-16 -d
Parameter |
Description |
|---|---|
<clustername> |
Specifies the cluster name. |
<operation> |
Specifies the operation as create, delete or configure-OIDC. |
-s |
Spektra fully qualified domain name. For example, spektra-ocpcluster.ocp.diamanti.com:5443 |
-b |
Spektra build version. |
-c |
CA private cert and key pair. |
-C |
CA Public SSL certificate. |
Attaching AKS cluster to UA Domain
Run the following command if you have existing AKS cluster:
./aks-cluster.sh <cluster_name> configure -s <FQDN of UA domain:port> -c <CA_Certficate_Private_CertFileName>,<CA_Certficate_Private_KeyFileName> -C <CA_Certficate_Public_CertFileName> -b v3.8.0-16 -d
Or
Run the following command to create a new cluster
./aks-cluster.sh <cluster_name> create -s <FQDN of UA domain:port> -c <CA_Certficate_Private_CertFileName>,<CA_Certficate_Private_KeyFileName> -C <CA_Certficate_Public_CertFileName> -b v3.8.0-16 -d
You need to configure the DNS manually for the UA cluster domain. Add the Nameserver IP of AKS clusters primary nameserver to the UA clusters DNS.
To configure Coredns, update the ConfigMap with nameserver IP for the domain cluster.
apiVersion: v1
kind: ConfigMap
metadata:
    name: coredns-custom
    namespace: kube-system
     data:
       <ZONE_NAME>.server: | # you may select any name here, but it must end with the .server file extension
          <ZONE_NAME>:53 {
        errors
        cache 30
                forward . <Primary Nameserver Ip of Azure DNS Zone>
 }
For example, modify the UA clusters coredns with Azure clusters nameserver manually.
$  kubectl edit cm coredns  -n kube-system

   ocp.diamanti.com:53 {
      errors
       cache 30
       forward . 150.171.10.33
   }
Run the following script to generate kubeconfig on your local computer
$ ./create_spektra_service_account.sh

    Creating temporary directory to hold files: /tmp/spektra.dVG
    Error from server (NotFound): namespaces "spektra-system" not found
    Creating namespace spektra-system
    namespace/spektra-system created
    Error from server (NotFound): serviceaccounts "spektra-admin" not found
    Creating Service Account spektra-admin in namespace spektra-system
    serviceaccount/spektra-admin created
    Generating RBAC file...
    done
    Applying RBAC permissions...clusterrolebinding.rbac.authorization.k8s.io/spektra-admin created
    done
    Getting secret of service account spektra-admin on spektra-system
    Secret name: spektra-admin-token-glwn8

    Extracting ca.crt from secret...done
    Getting user token from secret...done
    Setting current context to: <clustername>-c1:admin:default
    Cluster name: <clustername>
    Endpoint: https://192.51.100.100:5443
    Preparing k8s-spektra-admin-spektra-system-conf
    Setting a cluster entry in kubeconfig...Cluster "<cluster-name>" set.
    Setting token credentials entry in kubeconfig...User "spektra-admin" set.
    Setting a context entry in kubeconfig...Context "<cluster-name>:spektra-admin:spektra-system" created.
    Setting the current-context in the kubeconfig file...Switched to context "<cluster-name>:spektra-admin:spektra-system".
    Kubeconfig for the new service account can be found in ./spektra-admin.kubeconfig
    All done!
Note
Login to cluster and the spektra service account need to be run on the same machine or the ~/.kube/conf file needs to be copied from the login environment to the local computer environment.
Log in as the newly created tenant admin.
Select Attach Cluster and then select Kubeconfig file created in above step which is spektra-admin.kubeconfig
Select Attach Cluster.
Deleting the AKS domain/tenant cluster
Run the following command to delete the existing AKS cluster. In this case, the cluster that will be deleted is spektratenantcluster.
./aks-cluster.sh spektratenantcluster delete -s <FQDN of domain:port> -b v3.8.0-16
Parameter |
Description |
|---|---|
<clustername> |
Specifies the cluster name. |
<operation> |
Specifies the operation as create, delete or configure-OIDC. |
-s |
Spektra fully qualified domain name. For example spektra-ocpcluster.ocp.diamanti.com:5443 |
-b |
Spektra build version. |
Configuring and Attaching OCP tenant cluster to UA Domain
To create an OCP tenant cluster:
Create a folder named ocp-tenant-install.
Download and extract the build file in the ocp-tenant-install.
deploy-scripts-3.8.0-16.tgz
kube-oidc-proxy-3.8.0-16.tgz
Run the following command to extract the deploy-scripts-3.8.0-16.tgz file.
$ tar -xvf deploy-scripts-3.8.0-16.tgz
aks-cluster.sh
create-kube-oidc-proxy-tls-secret.sh
create_spektra_service_account.sh
eks-cluster.sh
gke-cluster.sh
helm-install-spektra.sh
helm-uninstall-spektra.sh
kube-oidc-proxy-values-ingress.yml
ocp-cluster.sh
Copy the SSL certificate files in the ocp-tenant-install folder.
- Run the following command:
./ocp-cluster.sh <cluster-name> configure-oidc -s <spektra-fqdn>:<port> -c <ca.crt>,<ca.key> -C <root_ca.crt> -b v3.8.0-16
Run the following command to create a route for OIDC.
oc get route -n kube-oidc-proxy| grep -i kube-oidc
The following is the output, where kube-oidc-proxy-cluster2.ocp.diamanti.com is a route, and the administrator must add the DNS entry for that route.
NAMESPACE            NAME                             HOST/PORT                                    PATH    SERVICES                         PORT    TERMINATION   WILDCARD

kube-oidc-proxy      kube-oidc-proxy-passthrough      kube-oidc-proxy-cluster2.ocp.diamanti.com     -      kube-oidc-proxy-kube-oidc-proxy   6443   passthrough   None
The administrator must create the DNS entry for the hostname and the IP address of the Load Balancer for the OCP cluster.
Run the following script to generate kubeconfig on Loadbalancer machine of OCP Cluster:
./create_spektra_service_account.sh
 Creating temporary directory to hold files: /tmp/spektra.n3G
 NAME             STATUS   AGE
 spektra-system   Active   20h

 Namespace already exists. Moving on.
 NAME            SECRETS   AGE
 spektra-admin   1         20h

 Service Account already exists. Moving on.
 NAME                   TYPE                                  DATA   AGE
 spektra-admin-secret   kubernetes.io/service-account-token   4      20h

 Secret already exists. Moving on.
 Generating RBAC file...
 done

 Applying RBAC permissions...clusterrolebinding.rbac.authorization.k8s.io/spektra-admin unchanged
 done\nSecret name: spektra-admin-secret

 Extracting ca.crt from secret...done
 Getting user token from secret...done
 Setting current context to: admin
 Cluster name: cluster2
 Endpoint: https://api.cluster2.diamanti.com:6443

 Preparing k8s-spektra-admin-spektra-system-conf
 Setting a cluster entry in kubeconfig...Cluster "cluster2" set.
 Setting token credentials entry in kubeconfig...User "spektra-admin" set.
 Setting a context entry in kubeconfig...Context "cluster2:spektra-admin:spektra-system" created.
 Setting the current-context in the kubeconfig file...Switched to context "cluster2:spektra-admin:spektra-system".
 Kubeconfig for the new service account can be found in ./spektra-admin.kubeconfig

 All done!
In Spektra UI, log in as the newly created tenant admin.
Select Attach Cluster and then select
spektra-admin.kubeconfigKubeconfig file created above.
Select Attach Cluster.
Deploying applications
Consider the deployed application as Mongodb.
Create a project named <project1> and a namespace named <spektra-<tenant-name>-project-<project-name>.
Deploy the application. For more information, see Deploying an Application
Run the following command to apply the security policy:
oc adm policy add-scc-to-user privileged system:<spektra-<tenant-name>-project-<project-name>:<serviceaccountname>
For example, For mongodb application, the service account name is mongodb.
oc adm policy add-scc-to-user privileged system:<spektra-<tenant-name>-project-project1:mongodb
Note
- If the service account name is not used, then use the default service account,
Run the following command:
oc adm policy add-scc-to-user privileged system:<spektra-<tenant-name>-project-<project-name>:<default>
Note
Currently app discovery feature is not supported on OCP, hence you must not trigger app discovery.
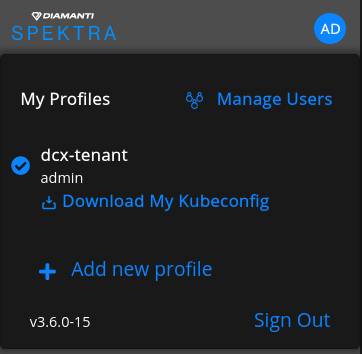
Downloading the Kubeconfig File
You can download the kubeconfig file and use it to run kubectl commands.
Log in into Spektra using the user that you want to download the kubeconfig.
Select the account name, select the action icon, and select Kubeconfig.
Although the tenant admin can create pods on the Domain cluster after downloading the kubeconfig file in the tenant or default namespace, it is not recommended.
The current kubeconfig context points to the domain cluster. This lets you launch applications on the tenant clusters using application configs with kubectl or inspect items on the domain cluster. However, you should not be running applications directly on the domain cluster.
Cluster Settings
After you attach the cluster, you can specify cluster settings such as Networks which is applicable for UA, and Storage Classes.
Select the cluster to display the cluster details page.
Select Settings to display the cluster summary.
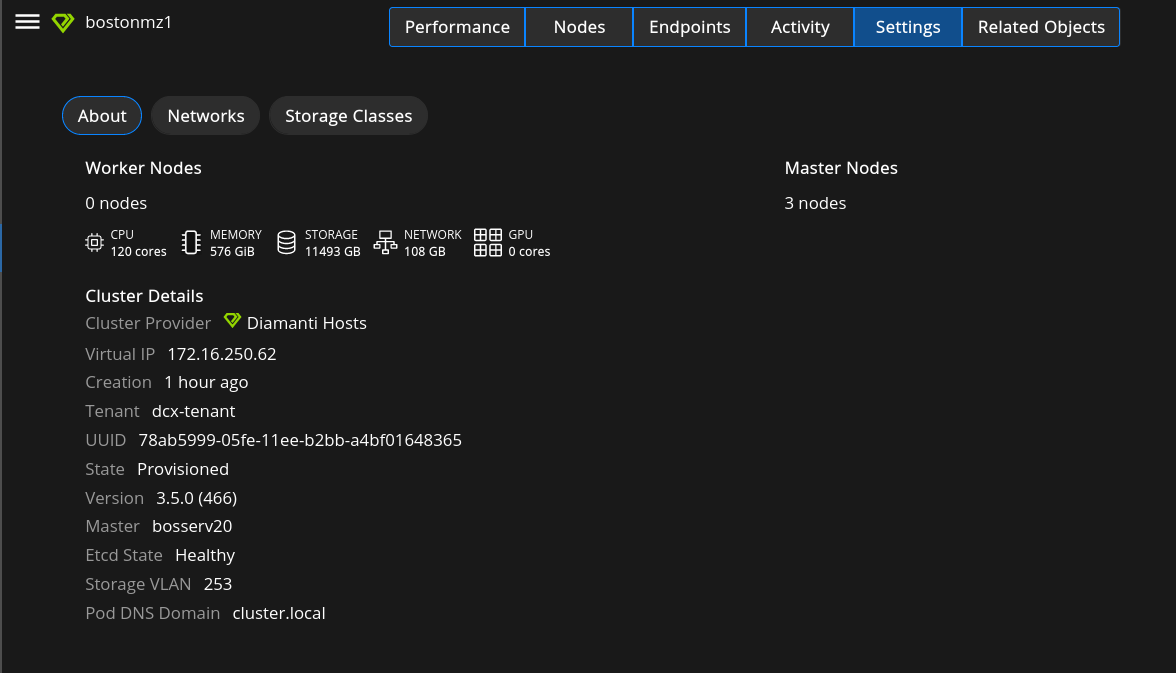
For UA the About page displays the Number of nodes, CPU, Memory, Storage, and Network of the cluster.
Cluster Details displays:
Creation - The time the cluster was created.
Tenant - The tenants in this cluster.
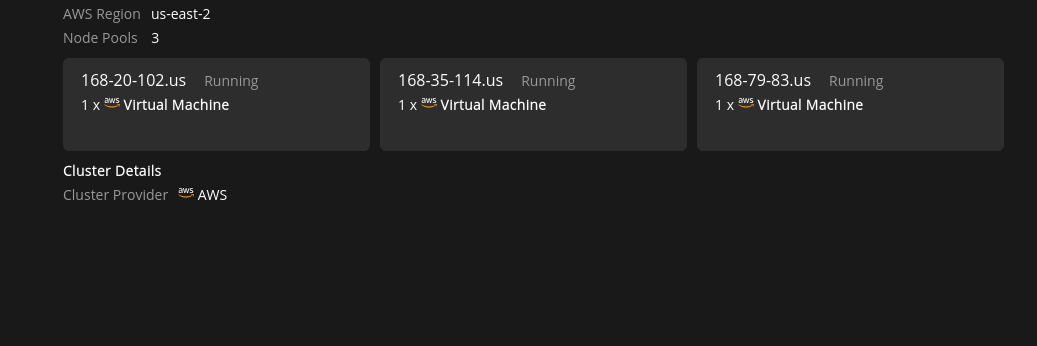
For EKS/GKE the About page displays the Number of nodes, Region.
View Networks For UA Cluster
Select the cluster to display the cluster details page.
Select Settings to display the cluster summary.
Select Networks in the cluster summary page to display the cluster Networks.
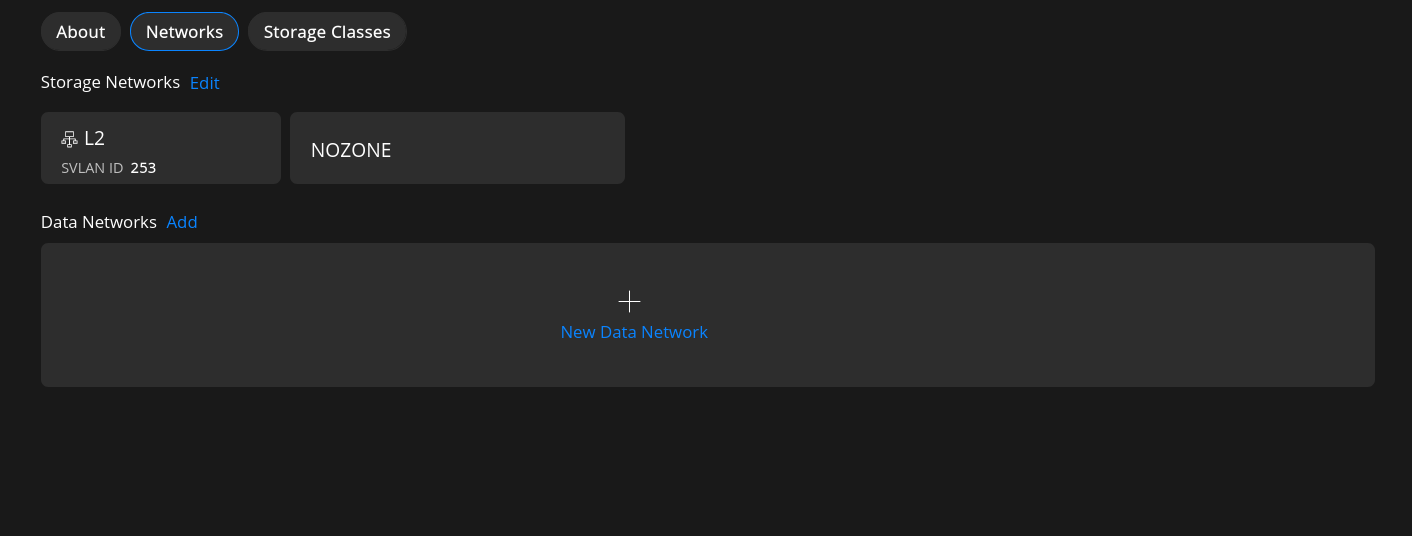
Adding a Data Networks
On the Networks page, select Add Data Network to Add Network page.
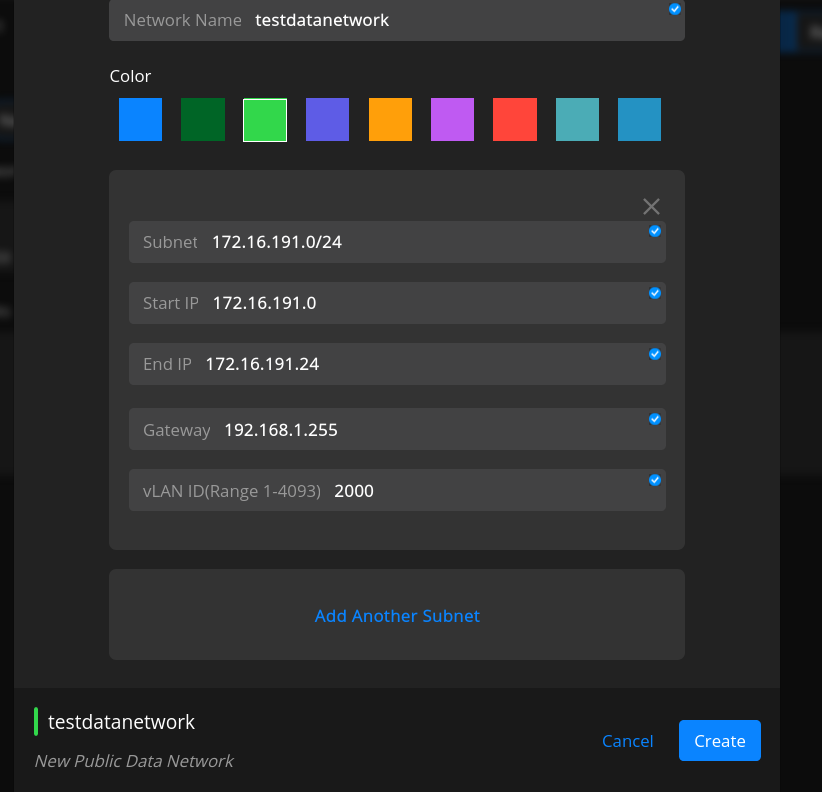
Enter all the details
Pick a color to differentiate the network.
Enter the IP address of the Subnet.
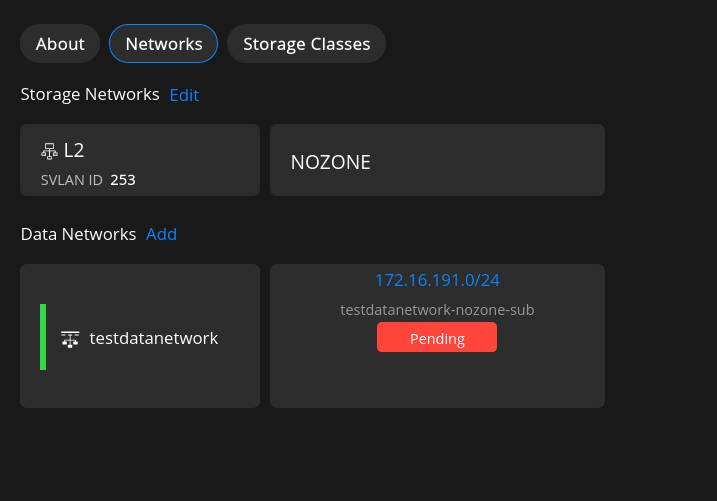
Select Create to create the Data Network.
The network appears in the list of cluster networks.
Deleting a data Network
In the Networks page, select a network.
select Delete Subnet .
Note
Network section is only available and applicable for UA clusters only.
Viewing Performance Tiers
Performance tiers represent guaranteed minimum performance and are used by objects such as storage classes. Performance maximums are not enforced. Higher performance workloads are prioritized over best-effort workloads.
Note
Diamanti Virtual Clusters do not support the Performance tier feature. This is only applicable to UA clusters
Note
Admins can not create a new performance tiers but can use already created performance tiers as mentioned below.
Spektra provides the following performance tiers:
Performance Tier
Storage IOPS
Network Bandwidth
high
20K IOPS
500 Mbps
medium
5K IOPS
125 Mbps
best-effort (default)
No minimum
No minimum
Admins cannot modify or delete the default built-in performance tier best-effort.
Performance tiers is optional while creating the Storage Class.
The built-in high performance tier offers 20K IOPS. This means that a maximum of 22 pods assigned to the high performance tier can be deployed on each node (500K/20K = 22.5). A similar calculation reveals the maximum number of pods that can be assigned to the medium performance tier, or any other user-defined tier.
The built-in best-effort performance tier has special characteristics. A Diamanti cluster allows pods assigned the best-effort tier to run on any node, while providing a guarantee that these pods will not interfere with pods assigned to other performance tiers. However, when pods assigned to other performance tiers do not use their IOPS/bandwidth, best-effort pods are provided the excess system resources. This makes best-effort pods particularly suited for specific types of tasks, such as running batch jobs.
Viewing Storage Classes For UA
A Storage class is a way of specifying attributes used while creating a volume (Ex: Size, Number of mirrors, performance tier, etc). When a volume is migrated from source to destination, the same storage class should exist on both source and destination. If the PVC spec is not specifying storage class, then the default storage class is used.
Note
There should be only one default storage class on a cluster.
Select the cluster to display the cluster details page.
Select Settings to display the cluster summary.
Select Storage Classes to display the storage classes page.
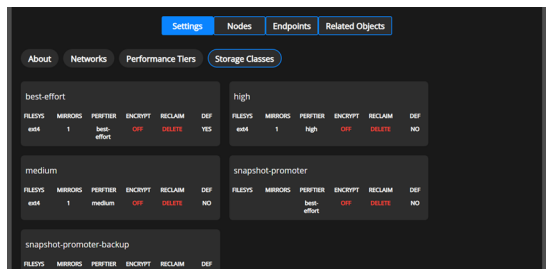
Each storage class displays the following Performance Tiers:
best-effort
high
medium
Each Storage class displays the following parameters:
Parameter
Description
FILESYS
The filesystem type for the volume, which has one of the following values:
ext3
ext4
xfs
block
MIRRORS
The number of mirrors to create for the volume. It has the values 1, 2, or 3.
PERFTIER
The performance tier associated with the volume, from among the following options:
high
medium
best-effort
Alternatively, you can specify a custom performance tier (previously created by an admin).
ENCRYPT
Specifies whether tier encryption is enabled.
RECLAIM
Indicates the reclaim policy.
DEF
Specifies whether the volume is the default volume.
Storage admins can create new storage classes, as needed. For example, if an admin needs to provision a dynamic volume with a mirror count of three, the admin should create a new storage class with the required mirror count. Similarly, storage admins can customize storage classes with different file system type and performance tier settings.
Note
If the node on which the vault pod runs is powered down, vault fails over to other nodes. However, this failover can take anywhere from 2.5 to 5.5 minutes. During this time, you cannot log in or perform some operations on the domain cluster. This is because vault is a stateful set and it uses three-way mirrored volume store data. The failover of volume takes about 1.5 to 4.5 minutes and the pod takes an additional minute after volume failover.
Adding Storage Classes in a Diamanti Cluster
You (storage admin) can create a new storage class if you want to customize the mirror count, file system, and performance tier settings.
Select the Diamanti cluster to display the cluster details page.
Select Settings to display the cluster summary.
Select Storage Classes to display the Storage Classes page.
- Select Add Storage Class on top of the page.
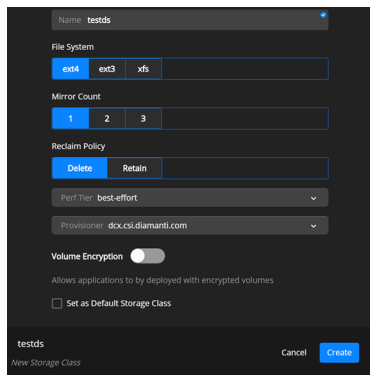
Specify the name of the storage class.
- Select to select a File System from the following options:
ext3
ext4
xfs
Select the Mirror Count, which is the number of mirrors to create for the volume. Valid values are 1, 2, or 3.
Specify the Reclaim Policy.
Delete - Select this option to delete the volume after the Persistent Volume Claim (PVC) is deleted.
Retain - Select this option if you want the volume to be available even if the PVC is deleted.
Select a Perf Tier from the drop-down. For details about the Perf Tier, see Viewing Performance Tiers.
Select the Provisioner (the plug-in used for provisioning volumes) from the drop-down.
Optionally, move the slider to select Volume Encryption. This lets you deploy applications with encrypted volumes.
Optionally, select the Set as Default Storage Class checkbox. When you request storage, you can specify a storage class. If you do not specify a storage class, the default storage class is used.
Select Create.
A confirmation message that the storage class is created appears. The storage class is added to the Diamanti cluster.
Note
Due to open issue Storage Class is created without any perf tier
Adding Storage Classes in a EKS/GKE Cluster
You (storage admin) can create a new storage class.
Select the EKS/GKE cluster to display the cluster details page.
Select Settings to display the cluster summary.
Select Storage Classes to display the Storage Classes page.
Select Add Storage Class.
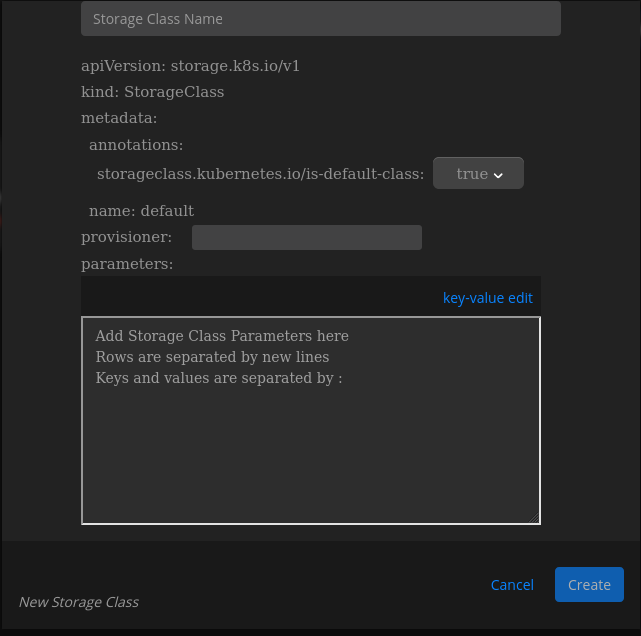
Specify the name of the storage class.
Select Provisioner [Note: If it is EKS then it will be kubernetes.io/aws-ebs].
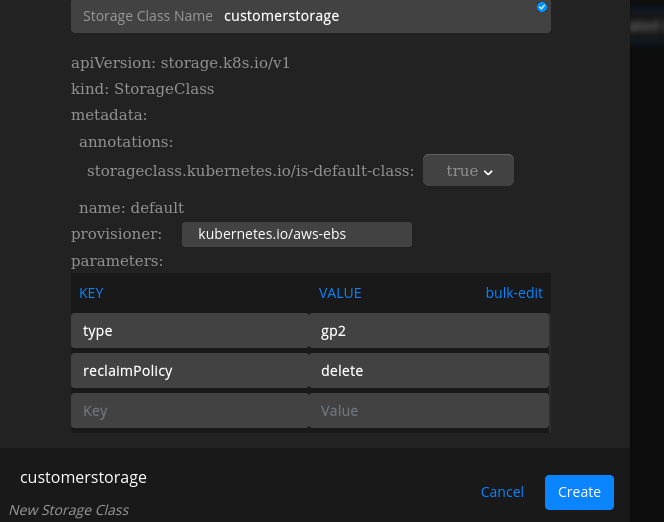
Select Create.
A confirmation message that the storage class is created appears. The storage class is added to the GKE/EKS cluster.
Viewing Nodes
Select the cluster to display the cluster details page.
Select Settings to display the cluster summary.
Select Nodes to display the list of nodes in the cluster.
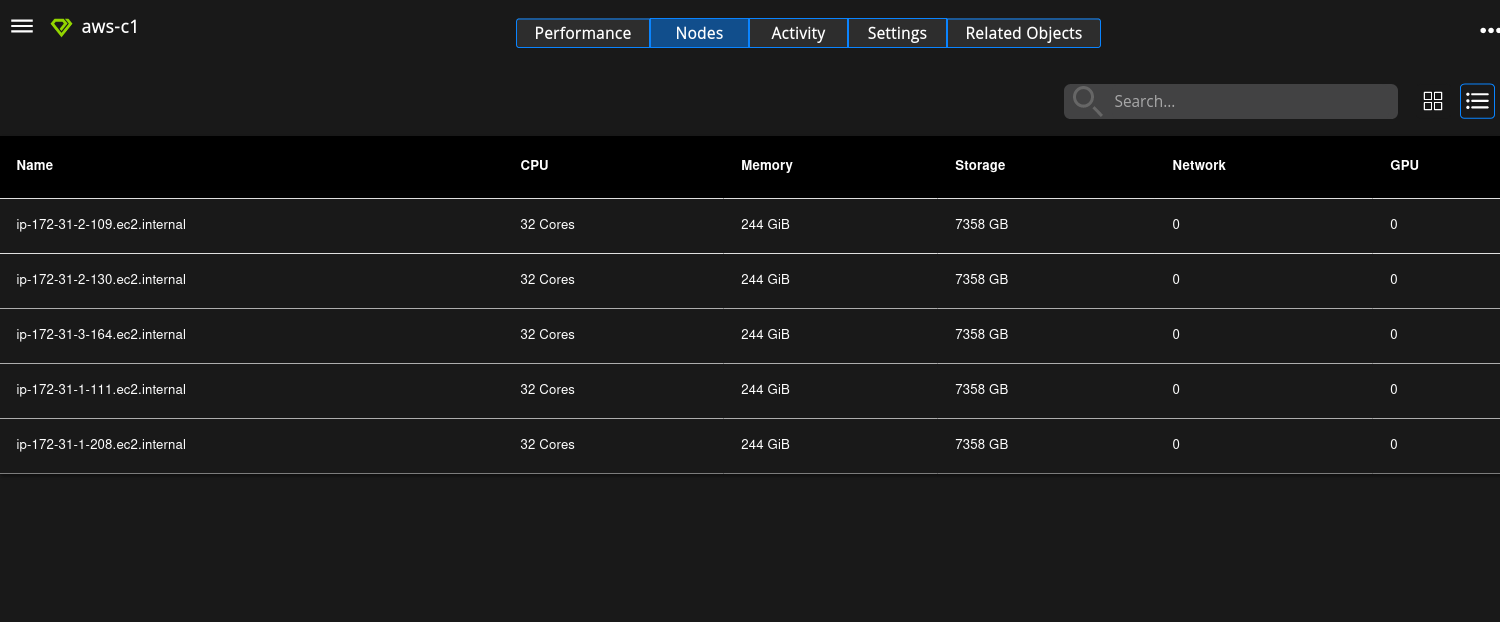
The Nodes page displays the following information for each node:
CPU - The CPU utilization of the node.
MEMORY - The memory utilization of the node.
STORAGE - The current storage used by the node.
NETWORK - The amount of data transferred by the node.
Viewing Related Objects
Select the cluster to display the cluster details page.
Select Settings to display the cluster summary.
Select the Related Objects to display the objects in the cluster:
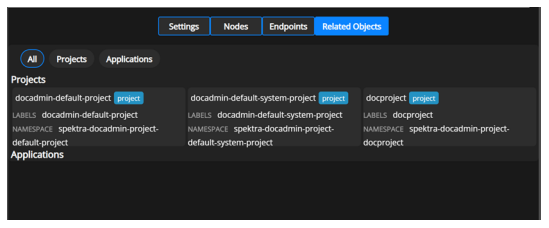
Select All to view all projects and applications in the cluster.
Select Projects to view the projects in the cluster.
select Applications to view the applications in the cluster.
Detaching a Cluster
Detaching a cluster removes the cluster from the tenancy without destroying the cluster itself, although Diamanti does not guarantee that the applications will be preserved.
Log in as the tenant admin.
Navigate to the Clusters tab
Select on the card of the cluster you want to detach
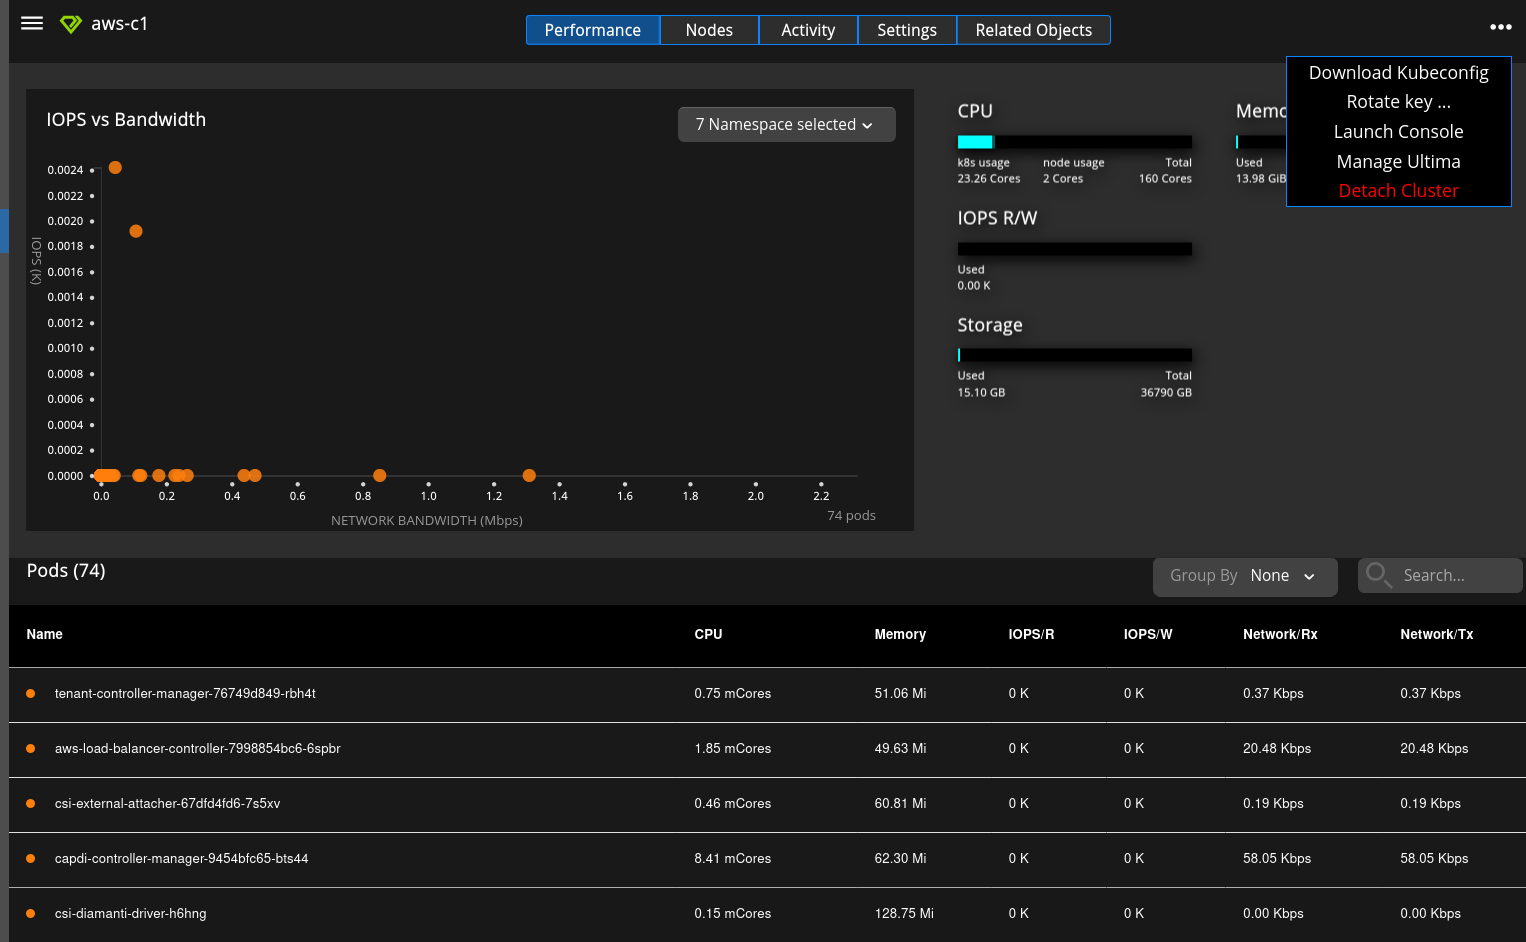
Select the ellipsis and select Detach Cluster.
Enter the name of the cluster you want to detach and select the Detach Cluster button
Detaching a cluster allows the user to use it again later for a different tenant or domain without needing to recreate it.