Spektra Installation Guide
Installing on Ultima
Prerequisites
The UA, UE-AWS, UE-GCP, UE-VM cluster must be up and running.
Valid SSL certificate for OIDC configuration
Helm should be installed into your local/remote machine from where the user is running the spektra installation.
On Google Console, manually add the Spektra port -5443 to the domain clusters loadbalancer, when setting up the UE-GCP domain.
Installation Steps
Login to node and perform the following steps:
Add certificates to /etc/diamanti/certs/
Edit the KUBE_AUTHENTICATION settings in /etc/kubernetes/apiserver and add the following
--oidc-issuer-url=https://<fqdn>:5443/v1/identity/oidc --oidc-username-claim=username --oidc-groups-claim=groups --oidc-client-id=kubernetes.local --oidc-username-prefix=- --oidc-ca-file=/etc/diamanti/certs/<crt-file>
Restart kubernetes API server
sudo systemctl restart apiserver.service
Ensure the
cert filehas 644 permissionsudo chmod 0644 /etc/diamanti/certs/cluster/domain-ca.crt
Note
At the very least, the apiserver.service should be restarted on the master node.
Download the helm chart from the Diamanti repository [For example: spektra-3.7.0-x.tgz]
Get k8s VIP of running cluster from UA/UE-AWS/UE-GCP/UE-VM. (<cluster-vip>)
Note
Steps 3 and 4 should only be performed if self-signed certificates are being used.
When using self signed certificate, ensure the <cluster-vip> is added in the CNAME record.
- Get FQDN corresponding to the cluster VIP (cluster.mydomain.com)
To find the FQDN of UA cluster, run the following command on any node
host <Cluster-vip>
To find the FQDN of UE-AWS cluster. You will get this FQA once the UE-AWS cluster is created, it displays with the following name
Cluster vip dns nameon one of the node.The FQDN on UE-GCP is
cluster-vipas FQDN.To find the FQDN of UE-VM cluster, run the following command on any node
host <clusterVIP>
Get the cluster CA certificate and key from the master node:
/etc/diamanti/certs/cluster/ca.crt
/etc/diamanti/certs/cluster/ca.key
Note
If you do not have self signed certificates, use the ca.crt and ca.key from the domain you have purchased.
Run the helm as following:
$ helm install spektra $HELM_CHART<spektra-3.7.0-x.tgz> \

    --set spec.clusterVip=$CLUSTER_VIP \
    --set spec.spektraFqdn=$SPEKTRA_FQDN<cluster.mydomain.com> \
    --set spec.controlPlaneCert.type=ssl \
    --set spec.controlPlaneCert.crt=<cat $CA_CERT_FILE | base64 -w 0> \
    --set spec.controlPlaneCert.key=<cat $CA_KEY_FILE | base64 -w 0>
Run the following command to confirm the Spektra installation:
$ helm ls

    NAME        NAMESPACE       REVISION        UPDATED                                 STATUS          CHART                   APP VERSION
    spektra     default         1               2023-06-08 16:08:32.250245546 +0530 IST deployed        spektra-3.7.0-15        3.7.0-15
Make sure the following conditions are met before setting up a spektra domain:
 $ kubectl wait pods -l app.kubernetes.io/instance=vault -n spektra-system --for condition=Initialized --timeout=0

    pod/vault-0 condition met

 $ kubectl wait pods -l app.kubernetes.io/instance=spektra-ingress -n spektra-system --for condition=Ready --timeout=0

     pod/spektra-ingress-ingress-nginx-controller-647d97c54b-skbrs condition met

 $ kubectl wait pods -l statefulset.kubernetes.io/pod-name=catalog-mongo-0 -n spektra-system --for condition=Ready --timeout=0

     pod/catalog-mongo-0 condition met

 $ kubectl wait pods -l control-plane=controller-manager -n spektra-system --for condition=Ready --timeout=0

     pod/capdi-controller-manager-b88bcd75b-nvtvl condition met
     pod/capi-attacher-controller-manager-686f6f5559-wdvtz condition met
     pod/capi-controller-manager-5f5775cb48-trccx condition met
     pod/capi-kubeadm-bootstrap-controller-manager-7d99996ff6-vwlqt condition met
     pod/capi-kubeadm-control-plane-controller-manager-565fb56c6f-tnr6k condition met
     pod/tenant-controller-manager-6c56dbdc86-r2z6k condition met

$ kubectl wait pods -l control-plane=upgrade-manager -n spektra-system --for condition=Ready --timeout=0

     pod/upgrade-manager-7868d69f4b-8zvsg condition met
Once these conditions met, you must setup spektra domain.
Configuring Domain
Open Spektra URL using https://<fqdn>:5443 and configure the Domain
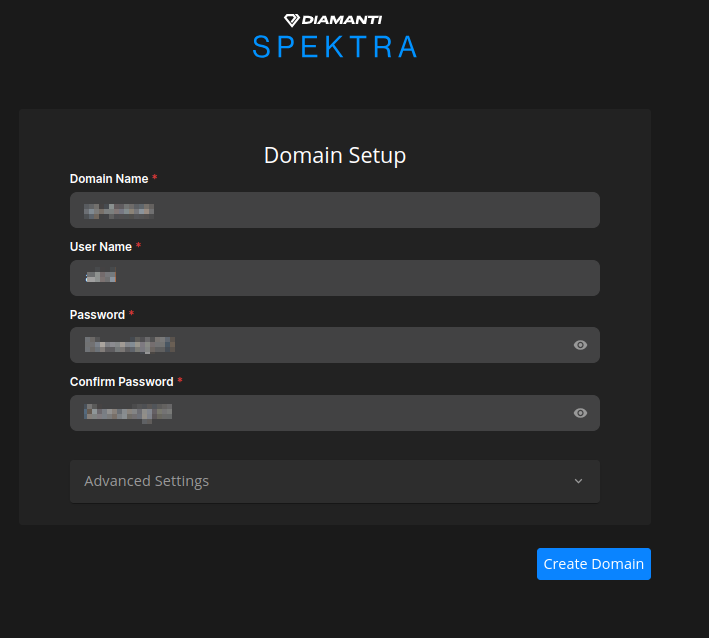
Navigate to the Domain setup page and enter the following, and select Create Domain:
Domain Name
User Name
Pasword
Confirm Password
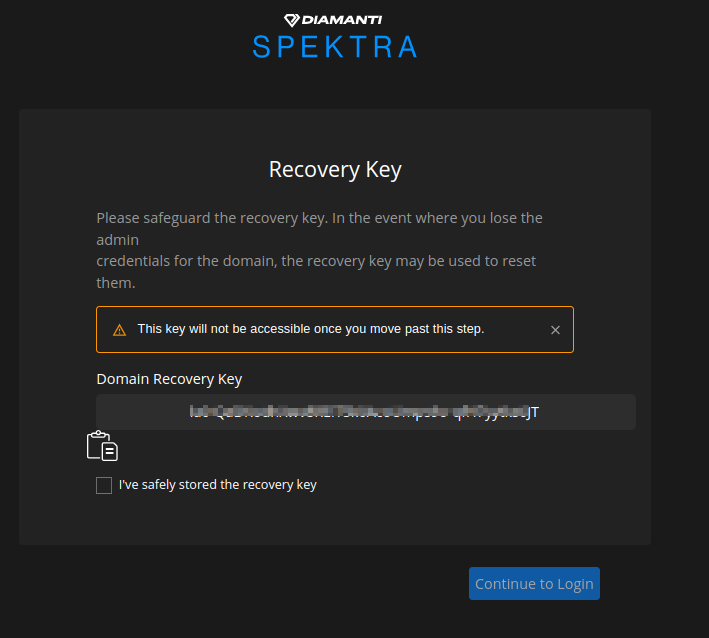
On the Recovery Key page copy the recovery key and select Continue to Login.
Note
You must save the Domain Recovery Key. This key is used when you forget your domain password.
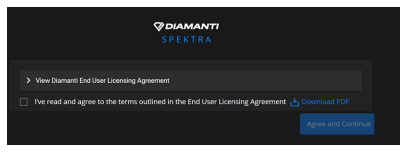
Select the checkbox to agree the EULA and then select Agree and Continue.
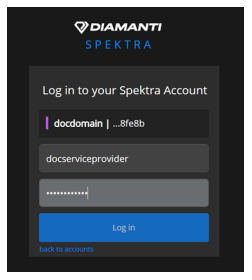
Enter the credentails and select Login. You are directed to SP Domain home page.
Check the following conditions to confirm the SPEKTRA installation.
$ kubectl wait pods -l app.kubernetes.io/instance=vault -n spektra-system --for condition=Ready --timeout=0

     pod/vault-0 condition met

$ kubectl wait pods -l statefulset.kubernetes.io/pod-name=spektra-minio-pool-0-0 -n spektra-system --for condition=Ready --timeout=0

     pod/spektra-minio-pool-0-0 condition met

$ kubectl wait pods -l app.kubernetes.io/name=query -n spektra-system --for condition=Ready --timeout=0

     pod/spektra-thanos-query-6dd9c57795-bq7cz condition met

$ kubectl wait pods -l monitoring.banzaicloud.io/storeendpoint=spektra-thanos -n spektra-system --for condition=Ready --timeout=0

     pod/spektra-thanos-spektra-thanos-store-5569d45cf-7mkxs condition met

$ kubectl wait pods -l statefulset.kubernetes.io/pod-name=spektra-thanos-receiver-soft-tenant-0 -n spektra-system --for condition=Ready --timeout=0

     pod/spektra-thanos-receiver-soft-tenant-0 condition met

$ kubectl wait pods -l statefulset.kubernetes.io/pod-name=spektra-thanos-receiver-soft-tenant-1 -n spektra-system --for condition=Ready --timeout=0

     pod/spektra-thanos-receiver-soft-tenant-1 condition met
Note
Check the above conditions after 15 - 20 minutes, if any one of the above conditions is not met, Spektra installation is having trouble.
Installing on GKE
Prerequisites
A GKE cluster should have the following configurations:
A GKE cluster should have the K8S 1.25 version.
There should be at least one worker node with a minimum configuration of E2-Standard-4 [4 VCPU and 16GB Memory].
You should enable the Identity Service. Using gcloud, enable the service by using the
enable-identity-serviceflag.gcloud container clusters create CLUSTER_NAME --enable-identity-serviceThe cluster must be updated with identity service if it has already been created.
gcloud container clusters update CLUSTER_NAME --enable-identity-serviceMake sure OIDC pods are running once the identity service is enabled.
In order to configure GKE OIDC, Spektra’s FQDN Issuer URL needs a CA certificate.
Please contact Diamanti support to get the Spektra helm chart tar file.
Installation Steps
To configure OIDC, create a patch file /tmp/client-config-patch.yaml with FQDN and CA certificates:
spec:
 authentication:
 - name: oidc
   oidc:
    clientID: kubernetes.local
    certificateAuthorityData: "<CA_CERT_FILE_BASE64>"
    issuerURI: https://<ISSUER_URI_HOST>:5443/v1/identity/oidc
    cloudConsoleRedirectURI: https://console.cloud.google.com/kubernetes/oidc
    kubectlRedirectURI: https://<ISSUER_URI_HOST>:5443
    userClaim: username
    groupsClaim: groups
    userPrefix: "-"
Note
Replace <ISSUER_URI_HOST> with the FQDN and <CA_CERT_FILE_BASE64> with the base64 hash of
.crtfile.Note
Steps 2 and 3 should only be performed if you have self-signed certificates.
Run the following command to set OIDC authentication:
$ kubectl patch clientconfig default -n kube-public --type merge --patch-file /tmp/client-config-patch.yaml

Expected Output:

clientconfig.authentication.gke.io/default patched
Run the following command to get the OIDC VIP address:
$ kubectl -n kube-public get clientconfig default -o jsonpath="{.spec.server}"

Expected Output:

https://<OIDC_VIP>:443
Set up the Cloud DNS for your FQDN. If the DNS entry already exists, skip this step:
$ gcloud dns managed-zones create <snakecase DNS zone name>-dns --description=<snakecase DNS zone name>-dns --dns-name=<DNS zone name> --visibility=private --networks=default

$ gcloud dns record-sets create <FQDN of your cluster> --rrdatas=8.8.8.8 --type=A --ttl=60 --zone=<snakecase DNS zone name>-dns
Run the helm:
$ helm install spektra <HELM_CHART_TAR_FILE> \

    --set spec.clusterVip=<OIDC_VIP> \
    --set spec.spektraFqdn=<FQDN> \
    --set spec.spektraPort=5443 \
    --set spec.clusterApiPort=443 \
    --set spec.controlPlaneCert.type=ca \
    --set spec.controlPlaneCert.crt=<CA_CERT_FILE_BASE64> \
    --set spec.controlPlaneCert.key=<CA_KEY_FILE_BASE64>
HELM_CHART_TAR_FILE - The name of the tar file provided by Diamanti Support for the spektra helm chart. For example: spektra-3.7.0-19.tgz.
OIDC_VIP It is the OIDC VIP address of the GKE cluster.
FQDN is fqdn used for cluster.
CA_CERT_FILE_BASE64 is valid .crt in base64 format.
CA_KEY_FILE_BASE64 is valid .key in base64 format.
Run the following command to confirm the Spektra installation:
$ helm ls

  NAME       NAMESPACE    REVISION        UPDATED                                 STATUS          CHART                   APP VERSION
  spektra    default      1               2023-06-08 16:08:32.250245546 +0530 IST deployed        spektra-3.7.0-15        3.7.0-19
Run the following command to check the status of all spektra system pods. All pods will be in spektra-system namespace.
Note
All Spektra system pods will be ready in 5-7 minutes.
$ watch "kubectl get po -n spektra-system"

Expected Output:

NAME                                                             READY   STATUS    RESTARTS        AGE
appcontroller-6f6cf8cf7d-k55c4                                   1/1     Running   0               5m38s
capdi-controller-manager-b88bcd75b-n87jg                         2/2     Running   0               6m2s
capi-attacher-controller-manager-686f6f5559-tfdk6                2/2     Running   0               5m51s
capi-controller-manager-5f5775cb48-g8h6n                         1/1     Running   0               6m25s
capi-kubeadm-bootstrap-controller-manager-7d99996ff6-65527       1/1     Running   0               6m20s
capi-kubeadm-control-plane-controller-manager-565fb56c6f-7dtz2   1/1     Running   0               6m14s
catalog-mongo-0                                                  2/2     Running   0               4m43s
catalog-mongo-1                                                  2/2     Running   0               3m36s
catalog-mongo-2                                                  2/2     Running   0               2m29s
dmsrv-67459d649b-p86vq                                           4/4     Running   4 (5m30s ago)   6m52s
dmsrv-67459d649b-r4h2m                                           4/4     Running   4 (5m23s ago)   6m52s
dmsrv-67459d649b-sn785                                           4/4     Running   4 (5m18s ago)   6m52s
mongodb-kubernetes-operator-677d664795-grxvl                     1/1     Running   0               5m11s
project-68854c66d8-njxhn                                         1/1     Running   0               5m31s
spektra-ingress-ingress-nginx-controller-647d97c54b-5qdf7        1/1     Running   0               6m50s
spektrasvc-7f754b4588-b7ktx                                      1/1     Running   0               7m7s
storagecontroller-6b565c46fb-xx246                               1/1     Running   0               5m25s
tenant-controller-manager-6c56dbdc86-dd7qv                       1/1     Running   0               5m34s
upgrade-manager-7868d69f4b-clkpk                                 1/1     Running   0               5m20s
vault-0                                                          0/1     Running   0               5m9s
Ensure the following conditions are met before setting up spektra domain:
$ kubectl wait pods -l app.kubernetes.io/instance=vault -n spektra-system --for condition=Initialized --timeout=0

       pod/vault-0 condition met

$ kubectl wait pods -l app.kubernetes.io/instance=spektra-ingress -n spektra-system --for condition=Ready --timeout=0

       pod/spektra-ingress-ingress-nginx-controller-647d97c54b-skbrs condition met

$ kubectl wait pods -l statefulset.kubernetes.io/pod-name=catalog-mongo-0 -n spektra-system --for condition=Ready --timeout=0

       pod/catalog-mongo-0 condition met

$ kubectl wait pods -l control-plane=controller-manager -n spektra-system --for condition=Ready --timeout=0

       pod/capdi-controller-manager-b88bcd75b-nvtvl condition met
       pod/capi-attacher-controller-manager-686f6f5559-wdvtz condition met
       pod/capi-controller-manager-5f5775cb48-trccx condition met
       pod/capi-kubeadm-bootstrap-controller-manager-7d99996ff6-vwlqt condition met
       pod/capi-kubeadm-control-plane-controller-manager-565fb56c6f-tnr6k condition met
       pod/tenant-controller-manager-6c56dbdc86-r2z6k condition met

$ kubectl wait pods -l control-plane=upgrade-manager -n spektra-system --for condition=Ready --timeout=0

       pod/upgrade-manager-7868d69f4b-8zvsg condition met
Once the conditions are met set up Spektra domain.
Configuring Domain
Get the ingress address as mentioned:
kubectl -n spektra-system get svc spektra-ingress-ingress-nginx-controller -o jsonpath="{.status.loadBalancer.ingress[0].ip}"Add the host entry with ingress address.
sudo bash -c 'echo "<ingress-ip-address> <spektrafqdn> " >> /etc/hosts'Update the DNS record set by adding ingress entry.
gcloud dns record-sets update <spektra-fqdn> --rrdatas=<ip-address> --type=A --ttl=60 --zone=zone-nameOpen the spektra URL: https://<fqdn>:5443 and configure the Domain.
Navigate to the Domain setup page and enter the following, and select Create Domain:
Domain Name
User Name
Pasword
Confirm Password
Copy the recovery key and select Continue to Login
Note
You must save the Domain Recovery Key. This key is used when you forget your domain password.
On the Eula agreement page select the checkbox and then select Agree and Continue.
Enter the login credentails and select Login. You are directed to SP Domain home page.
Ensure the following conditions are met before setting up spektra domain:
$ kubectl wait pods -l app.kubernetes.io/instance=vault -n spektra-system --for condition=Ready --timeout=0


      pod/vault-0 condition met

$ kubectl wait pods -l statefulset.kubernetes.io/pod-name=spektra-minio-pool-0-0 -n spektra-system --for condition=Ready --timeout=0


      pod/spektra-minio-pool-0-0 condition met

$ kubectl wait pods -l app.kubernetes.io/name=query -n spektra-system --for condition=Ready --timeout=0


      pod/spektra-thanos-query-6dd9c57795-bq7cz condition met

$ kubectl wait pods -l monitoring.banzaicloud.io/storeendpoint=spektra-thanos -n spektra-system --for condition=Ready --timeout=0


      pod/spektra-thanos-spektra-thanos-store-5569d45cf-7mkxs condition met

$ kubectl wait pods -l statefulset.kubernetes.io/pod-name=spektra-thanos-receiver-soft-tenant-0 -n spektra-system --for condition=Ready --timeout=0


       pod/spektra-thanos-receiver-soft-tenant-0 condition met

$ kubectl wait pods -l statefulset.kubernetes.io/pod-name=spektra-thanos-receiver-soft-tenant-1 -n spektra-system --for condition=Ready --timeout=0


       pod/spektra-thanos-receiver-soft-tenant-1 condition met
Note
Check the above conditions after 15 - 20 minutes, if any one of the above conditions is not met, Spektra installation is having trouble.
Installing on EKS
Prerequisites
It is mandatory to use K8s 1.25 Cluster.
There should be at least one cluster node with a minimum configuration of t3.large [2 VCPU and 8GB Memory].
Valid public SSL/TLS/HTTPS certs for OIDC for EKS.
Installation Steps
Perform the following steps for OIDC configuration:
Below is the sample eks-domain-cluster-oidc.yaml:

apiVersion: eksctl.io/v1alpha5
kind: ClusterConfig
metadata:
  name: <eks-tenant-cluster-name>
  region: <region-name>
identityProviders:
- name: <eks-tenant-cluster-name>
  type: oidc
  issuerUrl: https://<spektra-fqdn>:5443/v1/identity/oidc
  clientId: kubernetes.local
  usernameClaim: username
  groupsClaim: groups
Associate identityProviders with below command:
eksctl associate identityprovider -f /tmp/eks-domain-cluster-oidc.yaml
Note
The fqdn is the domain cluster and certificate is in the base64 format.
Before Spektra is installed on the cluster, CA certs still need to be generated for the SSL communication between the load balancer and Spektra’s ingress. The preconfigured wildcard cert is used on the load balancer that serves the FQDN to the browser and tenant clusters. The CA certs here need not be valid since they are used only for encryption.
openssl genrsa -out spektra-dev-ca.key 2048

openssl req -x509 -new -nodes -key spektra-dev-ca.key -days 3650 -sha256 -out spektra-dev-ca.crt -subj "/CN=spektra-dev-ca"
Download the helm chart from the Diamanti repository [For example: spektra-3.7.0-x.tgz]
Run the helm as mentioned:
$ helm install spektra $HELM_CHART<v3.7.0-19> \

    --set spec.clusterVip=$CLUSTER_VIP <$(aws eks describe-cluster --name eks-test --region us-east-2 | jq -r '.cluster.endpoint' | sed -e 's@^https://@@'):443>\
    --set spec.spektraFqdn=$SPEKTRA_FQDN <eks-test.beta.aws-xxx.com> \
    --et spec.clusterApiPort=443” \
    --set spec.spektraPort=$SPEKTRA_PORT <5443> \
    --set spec.controlPlaneCert.type=ca \
    --set spec.controlPlaneCert.crt=<cat $CA_CERT_FILE | base64 -w 0> \
    --set spec.controlPlaneCert.key=<cat $CA_KEY_FILE | base64 -w 0>
    --set spec.controlPlaneCert.awsSslCertArn=$AWS_SSL_CERT_ARN <arn:aws:acm:us-east-2:12345678:certificate/43d49164-xxx-xxxx-xxxx-xxxx>
Note
Here $HELM_CHART will be say for ex: v3.7.0-19 , CONTROL_PLANE_CERT_TYPE value is ca , CONTROL_PLANE_CERT_CRT is your valid crt in base64 format
Run the following command to confirm the spektra installation:
$ helm ls

    NAME        NAMESPACE       REVISION        UPDATED                                 STATUS          CHART                   APP VERSION
    spektra     default         1               2023-06-08 16:08:32.250245546 +0530 IST deployed        spektra-3.7.0-19         3.7.0-19
Wait for few minutes to get the ingress:
kubectl -n spektra-system get svc spektra-ingress-ingress-nginx-controller -o jsonpath="{.status.loadBalancer.ingress[0].hostname}"; echo
Note
Note down this address as this address is required in next step, where the user has to add value for “Route traffic to load balancer”
Open the Route 53 page and create a record on AWS console:
Record name: <FQDN of your cluster>

Alias: on

Route traffic to endpoint: Alias to Application and Classic Load Balancer

Route traffic to region: Say for ex: US East (Ohio) [us-east-2]

Route traffic to load balancer: dualstack.<ELB load balancer DNS hostname> <a0f9e449f8b894d55b594fxxxx-123456789.us-east-2.elb.amazonaws.com>

Save the record and wait for Status which should be INSYNC
Ensure the following before setting up spektra domain:
$ kubectl wait pods -l app.kubernetes.io/instance=vault -n spektra-system --for condition=Initialized --timeout=0

      pod/vault-0 condition met
$ kubectl wait pods -l app.kubernetes.io/instance=spektra-ingress -n spektra-system --for condition=Ready --timeout=0 pod/spektra-ingress-ingress-nginx-controller-647d97c54b-skbrs condition met$ kubectl wait pods -l statefulset.kubernetes.io/pod-name=catalog-mongo-0 -n spektra-system --for condition=Ready --timeout=0 pod/catalog-mongo-0 condition met$ kubectl wait pods -l control-plane=controller-manager -n spektra-system --for condition=Ready --timeout=0 pod/capdi-controller-manager-b88bcd75b-nvtvl condition met pod/capi-attacher-controller-manager-686f6f5559-wdvtz condition met pod/capi-controller-manager-5f5775cb48-trccx condition met pod/capi-kubeadm-bootstrap-controller-manager-7d99996ff6-vwlqt condition met pod/capi-kubeadm-control-plane-controller-manager-565fb56c6f-tnr6k condition met pod/tenant-controller-manager-6c56dbdc86-r2z6k condition met$ kubectl wait pods -l control-plane=upgrade-manager -n spektra-system --for condition=Ready --timeout=0 pod/upgrade-manager-7868d69f4b-8zvsg condition met
Once the conditions met setup spektra domain.
Configuring Domain
Open the spektra URL like https://<fqdn>:5443 and configure the Domain
Navigate to the Domain setup page and enter the following, and select Create Domain:
Domain Name
User Name
Pasword
Confirm Password
Enter the login credentails and select on Create Domain
Copy the recovery key and select Continue to Login
Note
You must save the Domain Recovery Key. This key is used when you forget your domain password.
On the Eula agreement page, select the checkbox and then select Agree and Continue
Navigate to Login Page.
Enter the login credentails and select Login . You are directed to SP Domain home page.
Ensure the following conditions are met before setting up spektra domain:
$ kubectl wait pods -l app.kubernetes.io/instance=vault -n spektra-system --for condition=Ready --timeout=0

    pod/vault-0 condition met


$ kubectl wait pods -l statefulset.kubernetes.io/pod-name=spektra-minio-pool-0-0 -n spektra-system --for condition=Ready --timeout=0

   pod/spektra-minio-pool-0-0 condition met


$ kubectl wait pods -l app.kubernetes.io/name=query -n spektra-system --for condition=Ready --timeout=0

    pod/spektra-thanos-query-6dd9c57795-bq7cz condition met


$ kubectl wait pods -l monitoring.banzaicloud.io/storeendpoint=spektra-thanos -n spektra-system --for condition=Ready --timeout=0


      pod/spektra-thanos-spektra-thanos-store-5569d45cf-7mkxs condition met


$ kubectl wait pods -l statefulset.kubernetes.io/pod-name=spektra-thanos-receiver-soft-tenant-0 -n spektra-system --for condition=Ready --timeout=0


    pod/spektra-thanos-receiver-soft-tenant-0 condition met


$ kubectl wait pods -l statefulset.kubernetes.io/pod-name=spektra-thanos-receiver-soft-tenant-1 -n spektra-system --for condition=Ready --timeout=0


     pod/spektra-thanos-receiver-soft-tenant-1 condition met
Note
Check the above conditions after 15 - 20 minutes, if any one of the above conditions is not met, Spektra installation is having trouble.
Installing on AKS
Prerequisite
- The following files need to be in the same folder where aks-cluster.sh resides, prior to execution of script.
create-kube-oidc-proxy-tls-secret.sh (if self-signed certificates are provided)
kube-oidc-proxy-values-ingress.yml
helm-install-spektra.sh (for spektra installation on domain)
aks-cluster.sh
create-kube-oidc-proxy-tls-secret.sh
create_spektra_service_account.sh
helm-install-spektra.sh
helm-uninstall-spektra.sh
kube-oidc-proxy-values-ingress.yml
ingress-nginx-3.8.0-16.tgz
kube-oidc-proxy-3.8.0-16.tgz
Before you configure the AKS Domain/tenant cluster, open aks-cluster.sh script and modify the following variables based on the cluster environment:
RESOURCE_GROUP
LOCATION, INSTANCE_TYPE
KUBERNETS_VERSION
Installation Steps
Install Azure CLI to configure Azure. For more information, see Install Azure CLI on Linux.
Login Azure CLI using the following command:
az login
To complete the authentication process, follow the instructions on the terminal. For more information az login.
Create a folder named aks-configure.
Download the following files in the aks-configure folder.
deploy-scripts-3.8.0-16.tgzingress-nginx-3.8.0-16.tgzkube-oidc-proxy-3.8.0-16.tgz
Extract the
deploy-scripts-3.8.0-11.tgzfile. Run the following command to extract:$ tar -xvf deploy-scripts-3.8.0-11.tgz
The following is the output of the extracted tar file.
aks-cluster.sh create-kube-oidc-proxy-tls-secret.sh create_spektra_service_account.sh helm-install-spektra.sh helm-uninstall-spektra.sh kube-oidc-proxy-values-ingress.yml
Copy the SSL certificate files of the domain inside the aks-configure folder.
If SSL certificates are available, then copy the root certificate, private SSL certificate,**private key** in the same folder of aks-cluster.sh.
If Self signed certificates are not available, then spektra-dev-ca.crt, spektra-dev-ca.key should be in the same folder of aks-cluster.sh.
Following are commands to generate the SSL certificates it if it does not exists:
openssl genrsa -out spektra-dev-ca.key 2048openssl req -x509 -new -nodes -key spektra-dev-ca.key -days 3650 -sha256 -out spektra-dev-ca.crt -subj "/CN=spektra-dev-ca"Run the following command to register azure providers:
$ ./aks-cluster.sh spektra-aks-cluster register -s spektra-domain.ocp.diamanti.com:5443  -b 3.8.0-16
AKS: Registering providers...
Registering Azure Microsoft.ContainerService
Registering Azure Microsoft.Compute
Registering Azure Microsoft.Network
Registering Azure Microsoft.Storage
Registering Azure Microsoft AzureActiveDirectory
Run the following command to access the Azure cluster if the Azure cluster has already been created.
az aks get-credentials --resource-group <resource-group> --name <name-of-azure-cluster>
Run the following command to create AKS cluster and configure Spektra domain if you have purchased the SSL certificate.
./aks-cluster.sh <cluster_name> create -s <FQDN:port> -c <CA_Certficate_Private_CertFileName>,<CA_Certficate_Private_KeyFileName> -C <CA_Certficate_Public_CertFileName> -b v3.8.0-16 -d
Run the following command to create AKS cluster and configure Spektra domain if you have not purchased the SSL certificate.
./aks-cluster.sh <cluster_name> create -s <FQDN:port> -b v9.9.2-310 -d
Parameter
Description
<clustername>
Specifies the cluster name.
<operation>
Specifies the operation as create, delete or configure-OIDC.
-s
Spektra fully qualified domain name. For example, spektra-ocpcluster.ocp.diamanti.com:5443
-b
Spektra build version.
-c
CA private cert and key pair.
-C
CA Public SSL certificate.
-d
Specifies to create a domain.
Once the AKS cluster is created, you can check using the following URL: https:// <FQDN:port>
Configuring AKS Domain
Open the spektra URL like https://<fqdn>:5443 and configure the Domain
Navigate to the Domain setup page and enter the following, and select Create Domain:
Domain Name
User Name
Pasword
Confirm Password
Enter the login credentails and select on Create Domain
Copy the recovery key and select Continue to Login
Note
You must save the Domain Recovery Key. This key is used when you forget your domain password.
On the Eula agreement page, select the checkbox and then select Agree and Continue
Navigate to Login Page.
Enter the login credentails and select Login . You are directed to SP Domain home page.
Note
Check the above conditions after 15 - 20 minutes, if any one of the above conditions is not met, Spektra installation is having trouble.